
Making gnomes from bath puffs is one of those craft ideas that seems too simple to produce something genuinely beautiful — until you make the first one. Christmas gnomes from mesh shower sponges cost under $5 each, take 20 minutes, and produce a decoration that people assume you bought rather than made.
This guide covers the complete build for one gnome from start to finish, the variations that suit different color schemes and sizes, and the display ideas that make a collection of mesh sponge gnomes genuinely impressive as a seasonal decoration.
Table of Contents
Materials for One Mesh Sponge Christmas Gnome
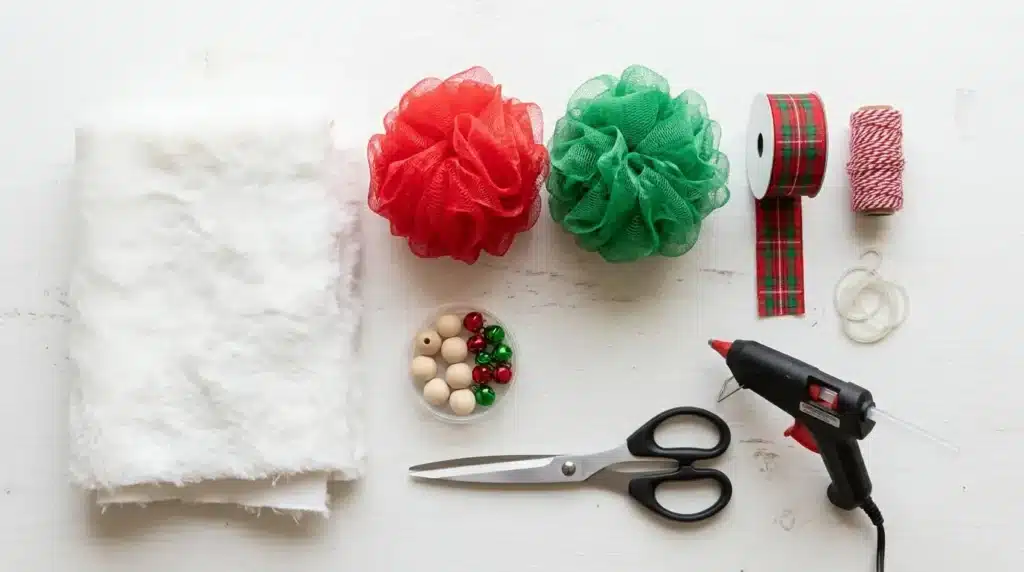
One mesh shower puff:
The body of the gnome. Standard bath puffs are 3 to 4 inches in diameter when compressed and produce a gnome of approximately 8 to 10 inches total height. The color of the mesh puff becomes the gnome’s body color — red for a traditional Christmas gnome, green for a forest gnome, or white for a winter gnome. The mesh texture creates the convincing chunky-knit body appearance that makes these gnomes so charming.
One rubber band or zip tie:
To cinch the mesh puff at the top to create the neck separation between body and hat zone. A rubber band is the easiest to work with. A zip tie can be trimmed flush and hidden under the hat.
Faux fur fabric — approximately 4 by 6 inches:
For the beard. White or grey faux fur cut into a long triangle creates the gnome’s most distinctive feature. The longer the beard triangle the more traditional and more impressive the gnome looks.
One large wooden bead or pompom — 20 to 25mm:
The nose. A natural wooden bead in skin tone, a pink pompom, or a small ball of air-dry clay shaped and painted skin tone all work. The nose is the face of the gnome — the beard covers everything else.
Hat material — felt, knit fabric, or a repurposed sock:
Felt cut and hot glued into a cone is the easiest hat. A repurposed Christmas sock cut and shaped is the most textured. A piece of knit fabric sewn into a cone is the most polished. All three work — felt is the beginner recommendation.
Hot glue gun, scissors, and optional embellishments:
Jingle bell for the hat tip. Narrow ribbon for a hat band. Small sprig of artificial holly for tucking into the beard. These optional additions add charm without adding complexity.
Step-by-Step Guide to Making the Gnome
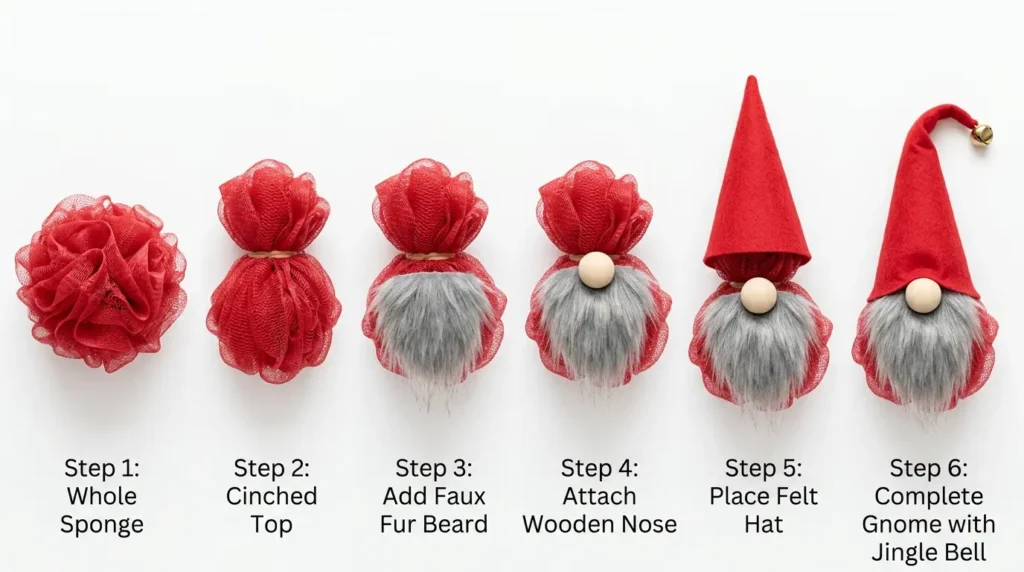
Step 1: Prepare the Mesh Puff Body
Remove the hanging cord from the mesh puff if it has one — pull it out from the center knot. Fluff the puff out into its fullest rounded shape by pulling the mesh layers apart gently. The more fully expanded the puff the rounder and more generous the gnome body. If the puff has a flat compressed shape from packaging work it between your hands for 30 seconds to restore its natural rounded form.
The mesh puff has a natural gathering point at the center top where the cord was attached — this becomes the neck cinch point. Identify this point before moving to the next step.
Step 2: Cinch the Neck
Wrap a rubber band tightly around the mesh puff approximately one third from the top. This cinch creates the neck separation — the upper third becomes the head zone where the hat sits and the lower two thirds become the body. Pull the rubber band as tight as it will go. The cinch should compress the mesh completely — the tighter the cinch the more defined the head-body separation and the more gnome-like the silhouette.
Wrap the rubber band three to four times rather than leaving it as a single loop. Multiple wraps create a tighter and more defined cinch that does not loosen when you add the hat and beard later.
Step 3: Make and Attach the Beard
Cut a long triangle from the faux fur fabric — approximately 3 inches wide at the top and 5 to 6 inches long, tapering to a soft point at the base. Cut the faux fur from the back with scissors — cutting from the front pulls the fur fibers. Apply a line of hot glue along the top straight edge of the fur triangle and press firmly onto the front of the gnome body just below the rubber band cinch. Hold for 15 seconds.
The beard should cover the front of the body from just below the neck cinch down to approximately the halfway point of the body. A beard that is too short loses the gnome character. A beard that extends to the base of the body looks more impressive and more traditional.
Step 4: Attach the Nose
Apply a generous dot of hot glue to the back of the wooden bead or pompom nose. Press it firmly onto the front of the head zone — the upper third of the gnome above the beard — centered and slightly above the beard top edge. Hold for 20 seconds. The nose should protrude forward from the mesh surface rather than sinking into it.
The nose position determines the personality of the gnome. Positioned high it looks surprised. Positioned at the center of the head zone it looks classic. Positioned low where it almost touches the beard it looks like the gnome is peering over its own facial hair — the most characterful position.
Step 5: Make and Attach the Hat
Cut a semi-circle from felt with a straight edge radius of 5 to 6 inches. Roll it into a cone shape that fits snugly over the head zone of the gnome — the open base of the cone should sit just above the rubber band cinch. Hot glue the overlapping felt edge to hold the cone shape. Trim the base edge if needed so it sits level. Apply hot glue around the inside base rim of the hat cone and press it firmly onto the head zone.
The hat angle creates the gnome’s personality. A hat sitting straight upright looks formal. A hat tilted slightly to one side looks playful and more characterful — the slight tilt is the detail that makes gnomes look lively rather than stiff.
Step 6: Add the Finishing Details
Hot glue a jingle bell to the tip of the felt hat. Wrap a narrow ribbon around the base of the hat and tie a small bow to cover the rubber band cinch. Tuck a small sprig of artificial holly or a tiny berry pick into the beard or the hat ribbon bow. These three finishing details take 5 minutes and transform a completed gnome into a finished decoration.
Stand the finished gnome on a flat surface. The rounded mesh base creates a stable standing surface without any additional support. If the gnome tips forward add a small flat pebble or wooden disc inside the base mesh layers as ballast.
Four Mesh Sponge Gnome Variations
Traditional Red Christmas Gnome
Red mesh puff, white faux fur beard, red felt cone hat with a white pompom tip instead of a jingle bell, wooden bead nose in natural tone. The classic Scandinavian gnome color palette that suits any traditional seasonal display. Make three in graduated sizes for a gnome family display.
Green Forest Gnome
Green mesh puff, grey faux fur beard, deep green felt hat with a brown ribbon band. Tuck a small sprig of dried eucalyptus or artificial fern into the beard for the forest character. The green gnome suits natural and woodland-themed seasonal displays alongside pine cones, driftwood, and dried botanicals.
White Winter Gnome
White mesh puff, white faux fur beard, pale blue or silver felt hat with a silver jingle bell tip. Add a dusting of white glitter to the hat and beard for a frost effect. The white winter gnome suits Scandinavian and neutral seasonal aesthetics where the traditional red palette feels too bold.
Mini Gnome from Half a Sponge
Cut a standard mesh puff in half through the center knot to create two smaller puff bodies. Each half makes a mini gnome of approximately 4 to 5 inches — perfect for ornament hanging on a tree or for creating a larger collection at lower cost. The mini gnome uses the same technique as the full-size version scaled down — a 15mm bead nose, a smaller fur triangle beard, and a proportionally smaller felt cone hat.
How to Display Mesh Sponge Christmas Gnomes

Mantel family display:
Three gnomes in graduated sizes nestled among fresh pine branches and pillar candles on the mantel creates the complete seasonal vignette. Position the largest gnome at the back and the two smaller ones at the front sides. The gnome family arrangement is the most consistently popular mesh sponge gnome display on Pinterest.
Tiered tray styling:
Position two or three gnomes on a tiered tray alongside pinecones, a small lantern, and a coil of battery fairy lights. The tiered tray vignette is the most versatile display option — it suits kitchen counters, coffee tables, and sideboards equally.
Staircase display:
One gnome on each stair step descending in size from top to bottom creates a playful staircase feature visible from the entrance hall. Use the mini gnome variation for the lower steps to create the size graduation naturally.
📌 More craft and seasonal decor ideas: How To Make Fake Christmas Porch Candle Decorations
Frequently Asked Questions
How do you make gnomes out of shower puffs?
To make gnomes from shower puffs remove the hanging cord from the mesh puff, cinch a rubber band tightly one third from the top to create the neck, hot glue a faux fur triangle beard to the front below the cinch, attach a wooden bead nose above the beard, hot glue a felt cone hat onto the head zone, and add a jingle bell tip and ribbon hat band to finish. The complete gnome takes 20 minutes and costs under $5 in materials per gnome.
What size mesh puff makes the best gnome?
A standard 3 to 4-inch bath puff produces a gnome of approximately 8 to 10 inches total height including the hat — the ideal size for mantel and tabletop display. Larger 5-inch jumbo bath puffs produce a gnome of 12 to 14 inches that works well as a floor display beside a fireplace or front door. Mini gnomes can be made from half a standard puff producing a 4 to 5-inch gnome suitable for tree ornaments and tiered tray styling.
What can I use instead of faux fur for the beard?
Alternative beard materials for mesh sponge gnomes include: white yarn cut into a fringe and hot glued in rows to create a textured beard. White felt cut into a triangle with fringe cuts along the edges. A small piece of white fluffy fleece fabric. White wool roving pulled into a beard shape. Cotton wool shaped and hot glued. Faux fur creates the most realistic and most impressive beard result but any white fluffy material produces a convincing gnome beard.
How long do mesh sponge gnomes last?
Mesh sponge gnomes stored in a box with tissue paper between uses last multiple seasons without deteriorating. The mesh puff body is essentially indestructible. The felt hat and faux fur beard maintain their quality indefinitely in dry storage. The hot glue bonds hold permanently once fully cured. A well-made mesh sponge gnome is a decoration worth keeping and reusing annually rather than a single-season throwaway craft.
Relevant Articles
→ How To Make Fake Christmas Porch Candle Decorations
→ How To Make Candy Stick Decorations From Pipe Cleaners
→ Christmas Pebble Painting Ideas You Will Love
→ 10 Cozy Christmas Living Room Ideas
Make one gnome this weekend and the second one will take half the time. By the third the technique is completely automatic and the only decision left is which color combination to make next.