
Making a pinecone snowman for Christmas is one of those crafts where nature does most of the work. A pinecone is already the right shape, already the right texture, and already has the natural warmth that makes handmade decorations so charming. A pinecone snowman takes 20 minutes to assemble, costs almost nothing if you collect your own pinecones, and produces a decoration that looks genuinely artisan rather than mass-produced.
This guide covers three pinecone snowman builds — a simple single-pinecone version, a stacked three-cone snowman with arms and scarf, and a painted snow-effect version that is genuinely show-stopping as a centerpiece or mantel display. Every build uses materials you likely already have or can source for under $5.
Table of Contents
Materials: What You Need for Each Build
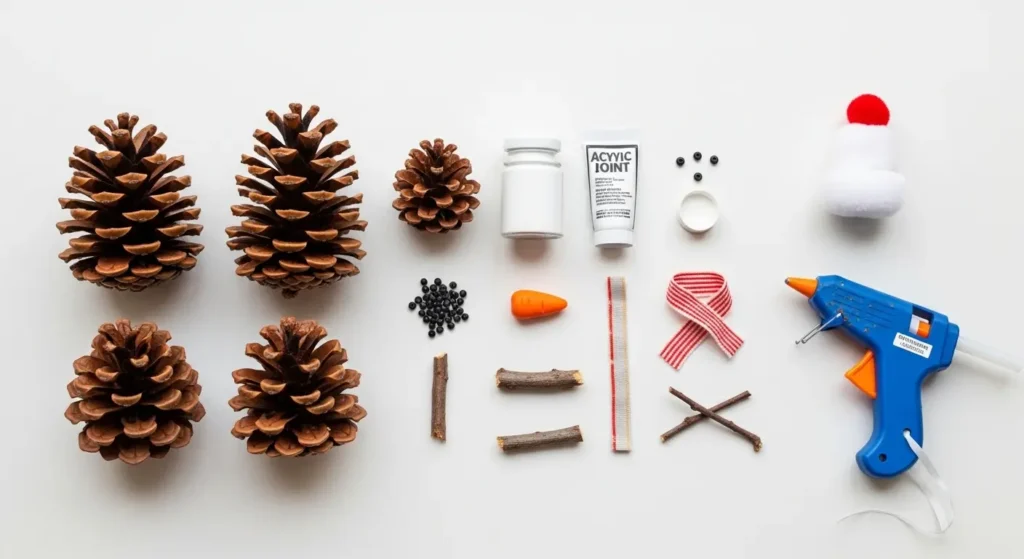
Pinecones:
Collect pinecones from garden, park, or woodland. Allow to dry completely indoors for 3 to 5 days before use — freshly collected pinecones have residual moisture and close up as they dry which changes the shape after assembly. Closed tight pinecones suit the body sections best — they have a more compact rounder shape. Open pinecones suit the base layer — the open scales create a stable flat base that prevents the snowman from tipping.
For the face and details:
Small black seed beads or black peppercorns for eyes. A tiny orange pompom, a small bead painted orange, or a piece of orange air-dry clay shaped into a carrot for the nose. Black seed beads in a curved line for the mouth smile. Two small twigs for arms — one each side pushed between the pinecone scales.
For the scarf and hat:
A narrow strip of fabric or ribbon approximately 6 inches long for the scarf — red and white check, plaid, or a simple solid color. A white pompom, a small acorn cap, a felt cone, or a miniature top hat shape cut from black felt for the hat. These two details transform a pinecone arrangement into an unmistakable snowman.
Hot glue gun and white acrylic paint are the only tools and finishes needed. White acrylic paint is optional for Build 1 and essential for Build 3.
Step-by-Step: Three Pinecone Snowman Builds
Build 1: The Simple Single-Pinecone Snowman (10 Minutes)
The single-pinecone snowman uses one closed medium-sized pinecone as the entire snowman body — the rounded base of the pinecone becomes the body and the pointed tip becomes the head zone. This is the fastest build and the most suitable for making in large batches for gift tags, table scatter, or gift topper decorations.
Step 1: Prepare the pinecone base
Apply a small amount of hot glue to the flat base of the pinecone and press it onto a small wooden disc, bottle cap, or flat cork to create a stable standing base. Hold for 15 seconds. The base prevents the snowman from rolling and allows it to stand upright on any flat surface.
Step 2: Add the face
Apply tiny dots of hot glue to two black seed beads and press them onto the upper third of the pinecone front face as eyes — position them close together for a rounder more cheerful expression. Add the orange nose bead centered below the eyes. Add three to five black beads in a gentle upward curve below the nose for the smile. Work quickly as hot glue sets in under 30 seconds.
Step 3: Add scarf and hat
Tie the narrow fabric strip around the pinecone at the neck zone — approximately one third from the top — and knot or bow at the front. The fabric sits naturally between the pinecone scales without slipping. Glue a small pompom or acorn cap to the very tip of the pinecone as the hat. For an acorn cap hat glue it flat-side down so the cup faces upward like a hat brim.
The single pinecone snowman is complete. It stands approximately 3 to 4 inches tall and is charming at any scale from close range.
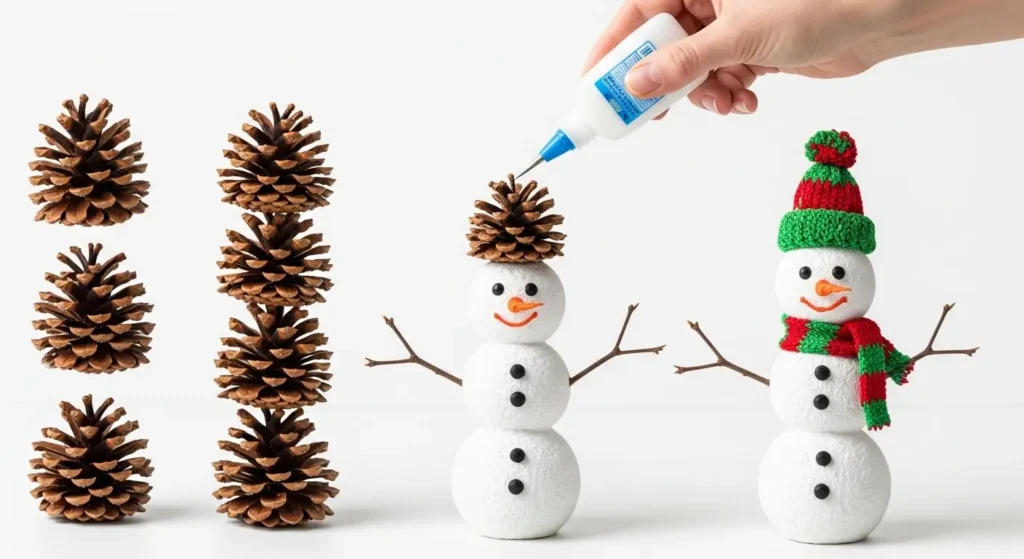
Build 2: The Stacked Three-Cone Snowman (20 Minutes)
The stacked three-cone snowman creates a proper snowman silhouette — large base cone, medium body cone, small head cone — that reads as a classic snowman from any viewing angle. Select three pinecones in clearly graduated sizes before starting.
Step 1: Stack and glue the three cones
Apply a generous ring of hot glue around the tip of the largest pinecone. Press the flat base of the medium pinecone firmly onto the glued tip of the large pinecone and hold for 20 seconds. Apply glue to the tip of the medium pinecone and press the small pinecone on top in the same way. Allow the full assembly to cool and set for 2 minutes before proceeding.
The stacking order matters for visual proportion. The largest cone at the base provides visual stability. The medium cone creates the body mass. The small cone at the top creates the head zone. If the cones are very similar in size the snowman silhouette reads as a pine cone stack rather than a snowman — the size graduation must be clearly visible.
Step 2: Add arms
Push one small twig between the scales on each side of the medium body pinecone at the widest point — approximately at the equator of the middle cone. The scales grip the twig ends naturally without glue in most cases. If the twig slips apply a tiny dot of hot glue into the scale gap before inserting the twig.
Step 3: Add face, scarf, and hat
Add face details to the small top pinecone as in Build 1. Tie the scarf fabric strip around the joint between the medium and small pinecones — this junction between body and head is the natural neck position. Add the hat to the tip of the top small cone. Optional: add three black bead buttons down the front of the medium body cone.
The stacked three-cone snowman stands 6 to 8 inches tall depending on the pinecone sizes selected and is the most impressive standalone display piece of the three builds.
Build 3: The Snow-Effect Painted Snowman (30 Minutes)
The painted snow-effect version takes the stacked three-cone structure of Build 2 and transforms it with a white paint treatment that creates the most convincing and most photographically beautiful pinecone snowman available.
Paint the pinecones before assembly
Dilute white acrylic paint with water to a thin wash consistency — approximately 1 part paint to 2 parts water. Brush the diluted paint over each pinecone covering the scale tips while allowing the recesses between scales to remain natural brown. The thin wash creates the snow-dusted effect where white covers the raised surfaces and natural brown shows in the shadows. Allow to dry completely before assembly.
For a heavier snow effect apply undiluted white paint to the scale tips only using a dry brush technique — load a small brush with white paint then wipe most of it off on a paper towel before brushing lightly across the pinecone tips. The dry brush technique deposits paint only on the highest surface points creating a precise snow-on-tip effect.
Add glitter for the show-stopping version
While the white paint is still slightly tacky sprinkle fine white or silver glitter over the painted pinecone scale tips. Tap off the excess. The glitter adheres to the painted tips and creates a frosted sparkle effect that catches light beautifully. Apply a light coat of hairspray over the dried glitter to prevent shedding during display.
Assemble the painted pinecones following Build 2 steps. The white-painted snowman with glitter tips, a red plaid scarf, and a black felt top hat is the most impressive version and the most frequently shared on Pinterest among all pinecone Christmas craft ideas.
Gorgeous Ways to Display Your Pinecone Snowmen

Winter wonderland tray centerpiece:
Arrange three pinecone snowmen in graduated sizes on a wooden tray or slate board. Fill the spaces between them with fresh pine branches, dried orange slices, cinnamon sticks, and a scattering of loose pinecones. Add battery fairy lights woven among the elements. The complete tray centerpiece creates a genuinely impressive table feature from entirely natural and free or near-free materials.
Mantel scene:
Position three to five snowmen in a loose group on the mantel shelf among greenery garland and pillar candles at different heights. The snowmen look most effective when partially surrounded by natural greenery — pine, eucalyptus, or ivy — that frames them as a complete winter scene rather than individual craft objects.
Gift toppers:
Attach small single-cone snowmen to wrapped gifts with a length of natural twine tied around both the snowman waist and the gift. The handmade snowman gift topper is always more appreciated than a purchased bow and transforms the gift presentation completely.
📌 More craft and seasonal decor ideas: How To Make Christmas Gnomes From Mesh Shower Sponges
Frequently Asked Questions
How do you make a snowman out of pinecones?
To make a pinecone snowman select three pinecones in graduated sizes and stack them tip-to-base using hot glue — largest at the bottom, medium in the middle, small on top. Add black seed bead eyes and smile, an orange bead or clay nose, twig arms pushed between the scales on each side, a narrow fabric scarf tied at the neck junction, and a small pompom or felt hat at the top. The basic stacked pinecone snowman takes 20 minutes and costs under $2 in materials if pinecones are collected for free.
How do you make pinecones look like snow for crafts?
The most effective snow effect on pinecones uses a diluted white acrylic paint wash — mix 1 part white acrylic paint with 2 parts water and brush over the pinecone allowing the scale tips to turn white while the recesses stay natural brown. For a heavier snow-on-tip effect use the dry brush technique — load a brush with white paint, wipe most of it off on paper towel, then lightly brush across the scale tips depositing paint only on the highest points. Finish with fine white or silver glitter applied while the paint is still slightly tacky for a frosted sparkle effect.
What size pinecones are best for snowman crafts?
For a stacked three-cone snowman the ideal sizes are a large base cone of 3 to 4 inches, a medium body cone of 2 to 2.5 inches, and a small head cone of 1 to 1.5 inches. The size graduation between cones should be clearly visible — cones too similar in size produce a stack that reads as a pine cone arrangement rather than a snowman. Closed compact pinecones work better than open ones for the upper body and head sections because their rounded form reads more convincingly as a snowman body shape.
How do you dry pinecones for crafts?
Dry freshly collected pinecones by spreading them in a single layer on a baking tray and placing in an oven at 200 degrees Fahrenheit for 30 to 60 minutes. The heat drives out moisture, kills any insects or larvae inside the pinecone, and causes closed pinecones to open up fully. Allow to cool completely before handling. Alternatively air-dry pinecones indoors in a warm dry position for 3 to 5 days. Fully dried pinecones hold their shape permanently and accept paint and glue cleanly without the warping that undried pinecones develop after assembly.
More Craft and Seasonal Decor Ideas
→ Christmas Pebble Painting Ideas You Will Love
→ How To Make Fake Christmas Porch Candle Decorations
→ How To Make a Mini Christmas Tree From Pipe Cleaners
Collect the pinecones this week. Make the first snowman tonight. By the time the season arrives you will have a complete display that cost almost nothing and looks like it came from an artisan Christmas market.