Building a DIY garden bench is one of the most satisfying weekend woodworking projects available — it produces something genuinely useful, lasts for decades when built correctly, and costs a fraction of what a comparable purchased bench would cost. A diy garden bench built from standard dimensional lumber using basic tools takes one afternoon and requires no specialist woodworking skills.
This guide covers the complete build from material selection and cutting list through assembly, jointing, finishing, and the weatherproofing treatment that determines how long the bench lasts outdoors. Every measurement and specification is given for a standard garden bench that seats two adults comfortably and fits the dimensions that suit most garden positions.
Table of Contents
Why a DIY Garden Bench Beats Any Purchased Alternative
A purchased garden bench at comparable quality to what this guide builds costs $200 to $500. The materials for this DIY garden bench cost $40 to $80 depending on lumber prices in your area. The quality of a hand-built bench is higher than any mass-produced equivalent because the joinery is stronger, the timber dimensions are correct for the application, and the builder controls every specification from seat height to back angle.
For a Father’s Day project the bench build is also something that can be done together — a dad and a child building a bench that will sit in the garden for the next twenty years is a better gift than anything that comes in a box. The bench becomes a permanent feature of the garden with a specific story attached to it.
Materials and Tools
Lumber Selection
This bench uses standard 2×6 dimensional lumber throughout — the same timber available at any hardware or builders merchant. 2×6 dimensional lumber provides the correct structural thickness for bench legs and seat boards without requiring specialist timber merchants or unusual sizes.
The best timber species for an outdoor garden bench in order of preference: pressure-treated pine for maximum weather resistance and lowest cost. Cedar for natural weather resistance and a beautiful grain without pressure treatment. Hardwoods such as oak or iroko for the longest lifespan and most attractive appearance at a higher material cost.
For a first bench build pressure-treated 2×6 pine is the correct choice — it is available everywhere, cuts and drills cleanly, holds screws well, and lasts 15 to 20 years outdoors without any additional treatment beyond a surface finish.
Complete Cutting List for a Two-Seat Garden Bench
Seat boards:
3 pieces of 2×6 at 150cm length — the three boards side by side create the seat width of approximately 43cm which provides a comfortable single-layer seat surface.
Back boards:
2 pieces of 2×6 at 150cm length — two boards provide adequate back height of approximately 28cm which suits most adults for comfortable back support.
Front legs:
2 pieces of 2×6 at 43cm length — the front legs set the seat height at 43cm from the ground which is the standard comfortable garden bench height for most adults.
Back legs:
2 pieces of 2×6 at 90cm length — the longer back legs extend above the seat level to support the back boards and create the back rest.
Support rails:
2 pieces of 2×6 at 40cm length — these horizontal rails connect the front and back legs on each side creating the leg frame assembly. 2 pieces of 2×4 at 140cm length — the long stretcher rails connect the two leg frame assemblies and provide the primary structural bracing for the complete bench.
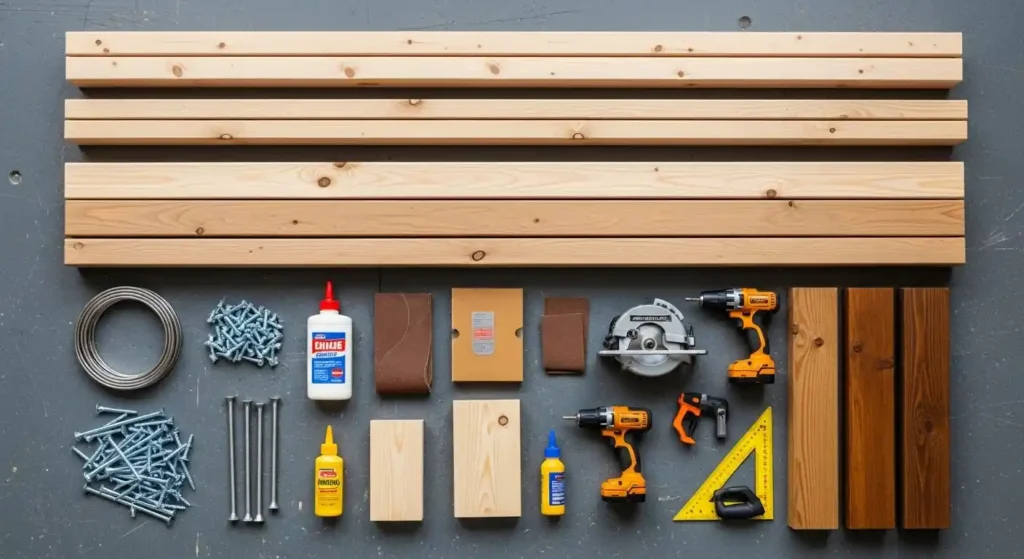
Tools Required
Circular saw or hand saw for cutting lumber to length. Cordless drill with screwdriver bit. 4mm and 6mm drill bits for pilot holes. Tape measure. Speed square or combination square. Sandpaper in 80 and 120 grit. Clamps — at least 4 medium bar clamps. Exterior wood screws — 3 inch stainless steel or galvanized. Wood glue rated for outdoor use. Exterior wood stain or oil for finishing.
Step-by-Step Build Guide
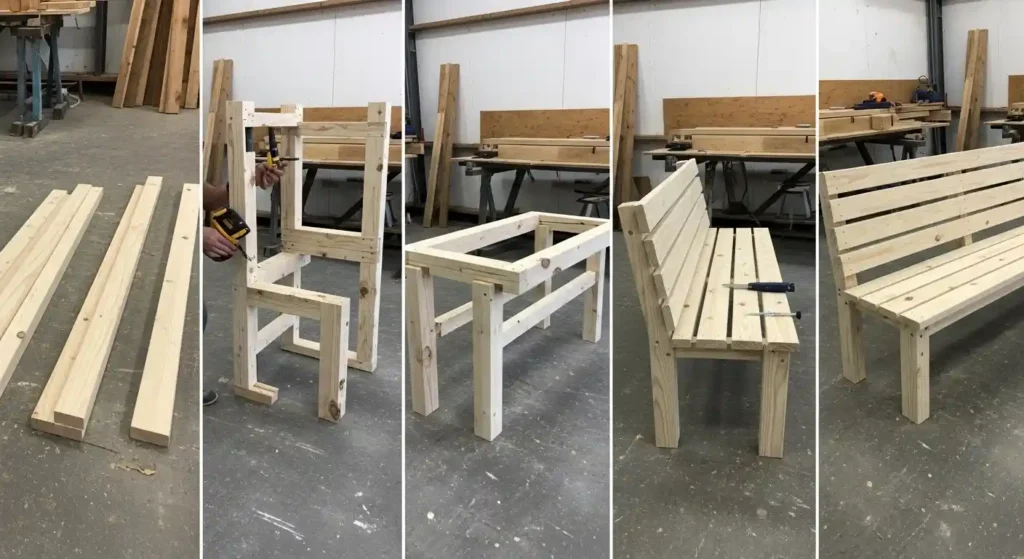
Step 1: Cut All Lumber to Length
Cut all pieces to the lengths specified in the cutting list using a circular saw or hand saw with a square guide to ensure perfectly straight cuts. Sand all cut ends immediately after cutting to remove splinters and rough fiber. Mark all pieces with a pencil before assembly — seat boards, back boards, front legs, back legs, side rails, and stretchers — so the assembly sequence is clear.
Accurate cutting is the foundation of a clean-looking bench. Take extra time on this step — a cut that is 5mm off square creates visible gaps at joints that no amount of sanding or filling will fully correct.
Step 2: Assemble the Leg Frames
For each leg frame: stand the front leg (43cm) and back leg (90cm) parallel to each other 40cm apart. Position the side rail (40cm piece) horizontally connecting the two legs — the top of the side rail sits flush with the top of the front leg at 43cm height and is fixed to the back leg at the same 43cm height. Apply wood glue to each joint surface, clamp firmly, and drill two pilot holes before driving 3-inch screws through the rail into each leg. Allow glue to set for 30 minutes before removing clamps. Build both leg frames using identical measurements.
Check each leg frame for square using a speed square before the glue sets — a frame that is even slightly out of square will make the completed bench rock on any flat surface. Adjust the clamp pressure to correct any out-of-square condition before the glue cures.
Step 3: Connect the Two Leg Frames With Stretcher Rails
Stand both leg frames upright parallel to each other 140cm apart — this is the bench length. Connect the front legs with one 140cm stretcher rail positioned at ground level or 10cm from the floor. Connect the back legs with the second stretcher rail at the same height. Apply glue to each joint, drill pilot holes, and drive 3-inch screws through each stretcher rail into each leg. Clamp and check for square across the full bench frame before the glue sets.
The completed frame should stand firmly without rocking. Place the frame on a known flat surface — a garage floor or patio — and check all four legs make contact simultaneously. If one leg is short adjust by adding a small timber shim or trimming the long leg.
Building a Durable DIY Bench Using Standard Dimensional Lumber

The durability of a DIY garden bench built from standard dimensional lumber depends on three factors: the quality of the wood-to-wood glue joints, the correct sizing of pilot holes to prevent timber splitting, and the choice of corrosion-resistant fasteners.
Pilot holes:
Always drill a pilot hole before driving any screw into dimensional lumber. The pilot hole diameter should be 80% of the screw shank diameter — for a 3-inch No.10 screw use a 4mm pilot hole. Skipping pilot holes causes the wood to split at joint positions which dramatically weakens the bench structure.
Countersinking:
Countersink every screw so the head sits flush with or just below the timber surface. Protruding screw heads catch clothing and prevent the bench surface from lying flat. A countersink bit on the drill creates the recess in one step before driving the screw.
Stainless steel fasteners:
Use stainless steel or hot-dip galvanized screws throughout the bench build. Standard zinc-plated screws rust within 2 to 3 outdoor seasons leaving brown stain trails down the timber face and eventually corroding sufficiently to weaken the joint. Stainless steel screws cost approximately 30% more and last indefinitely outdoors.
Step 4: Attach the Seat Boards
Lay the three seat boards across the top of the leg frame assembly with equal overhang at each end — approximately 5cm overhang on each side looks correct and prevents the seat from looking too short for the leg frames. Space the three boards with a 6mm gap between each board — a scrap piece of 6mm plywood used as a spacer ensures consistent gaps. Drill countersunk pilot holes and drive two 3-inch screws through each board into each side rail below. The three boards screwed to both side rails creates a rigid seat structure.
Step 5: Attach the Back Boards
Position the two back boards across the upper section of the back legs. The lower back board sits approximately 5cm above the seat surface. The upper back board sits 5cm above the lower back board with a matching gap. Both back boards overhang the back legs by the same amount as the seat boards overhang the side rails. Drill countersunk pilot holes and drive two screws through each board into each back leg. The back board angle can be slightly reclined by positioning the top of the back legs 3 to 4cm further back than the bottom — a reclined back rest is significantly more comfortable for extended sitting than a vertical one.
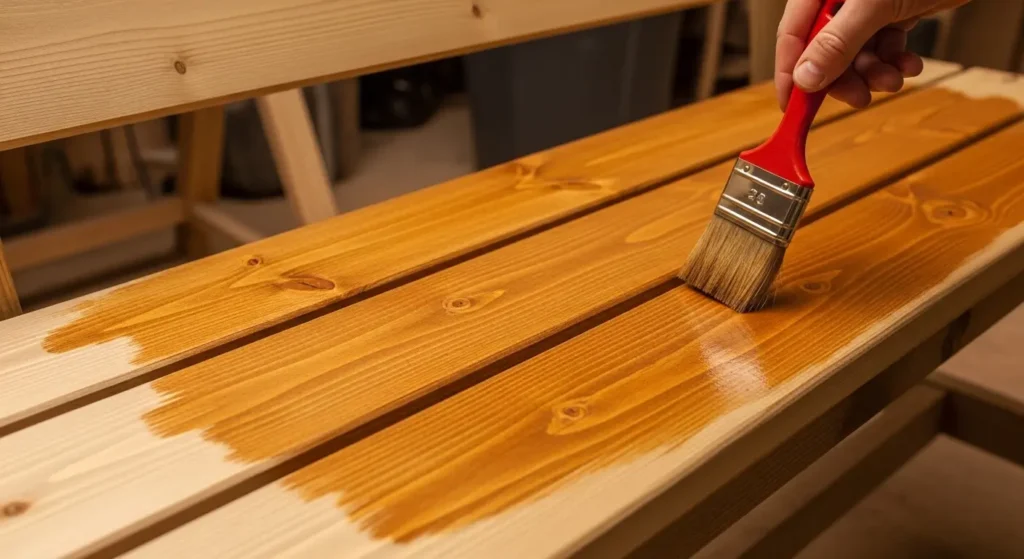
Finishing and Weatherproofing the Bench
Sand the entire completed bench with 80 grit sandpaper to remove all rough surfaces, splinters, and mill marks from the lumber surface. Follow with 120 grit for a smooth finish. Pay particular attention to the seat board surfaces and back board edges where skin contact will occur in use. Round all sharp corners and edges with sandpaper.
Exterior wood oil:
Apply two coats of exterior wood oil — Danish oil, teak oil, or a proprietary exterior timber oil — with a lint-free cloth. Oil penetrates the timber rather than sitting on the surface and provides the most natural-looking finish. Re-oil annually to maintain protection and colour depth.
Exterior wood stain:
Apply two coats of exterior wood stain in the desired colour for a more coloured finish that also provides UV and weather protection. Stain sits slightly on the timber surface and provides better protection than oil in very exposed positions. Re-apply every 2 to 3 years as the stain weathers.
📌 More garden and outdoor project ideas: How To Build a Small Pond With a Waterfall
Frequently Asked Questions
What wood is best for a DIY garden bench?
The best wood for a DIY garden bench is pressure-treated pine for budget builds, cedar for natural weather resistance without treatment, and hardwoods such as oak or iroko for the longest lifespan and most attractive appearance. For a first bench build using standard dimensional lumber pressure-treated 2×6 pine is the correct choice — it is widely available, easy to work with, holds screws well, and lasts 15 to 20 years outdoors. According to the Timber Research and Development Association pressure-treated pine is the most appropriate timber for ground-contact and outdoor furniture applications where budget is a primary consideration.
How long does a DIY garden bench take to build?
A DIY garden bench built from the plan in this guide takes 4 to 6 hours from first cut to completed assembly for a confident DIY builder — one afternoon. Allow an additional 2 to 3 hours for sanding and finishing. Most of the build time is in the cutting and assembly stages — an accurate cutting list and clean cuts make assembly significantly faster. First-time bench builders should allow a full day including the finishing treatment.
How do I make a garden bench last longer outdoors?
The three factors that most determine how long a DIY garden bench lasts outdoors: the timber species and treatment, the fastener type, and the surface finishing and maintenance. Use pressure-treated or naturally durable timber. Use stainless steel or hot-dip galvanized screws throughout. Apply two coats of exterior oil or stain and re-apply every 1 to 2 years. Store cushions indoors during winter. Position the bench so it is not in permanent contact with damp ground — set the legs on small flat stones or tiles to prevent direct ground contact. A bench built correctly and maintained annually will last 20 to 30 years outdoors.
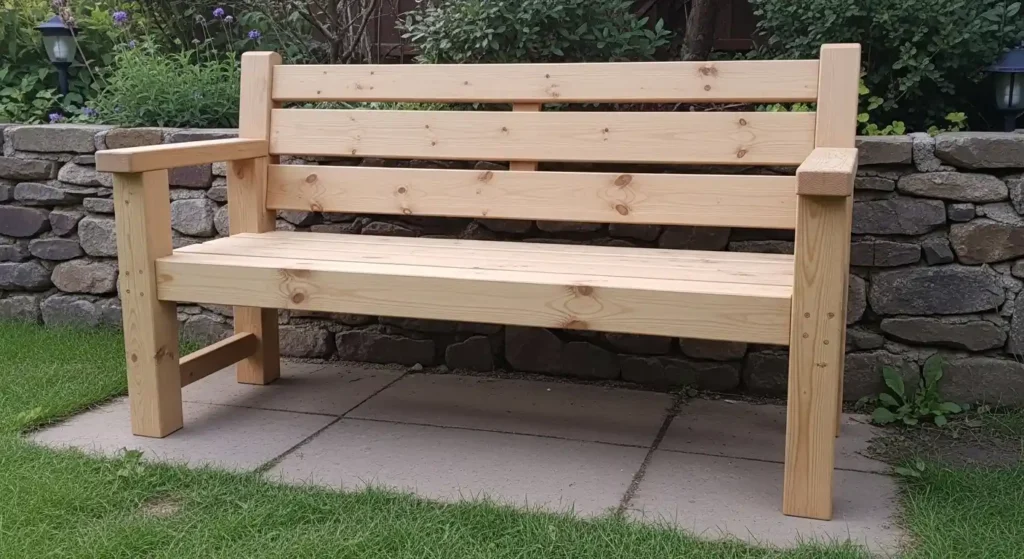
What size should a garden bench be?
A standard garden bench for two adults is 150cm long, 43 to 46cm seat height, 40 to 45cm seat depth, and 80 to 90cm total height to the top of the back rest. The seat height of 43cm matches standard chair height and allows most adults to sit comfortably with feet flat on the ground. The seat depth of 40 to 45cm provides adequate support without the bench feeling too deep to sit in comfortably. These dimensions are used in the cutting list in this guide and produce a bench that suits adults of most heights comfortably.
More Garden and Outdoor Project Ideas
→ 10 Peaceful Garden Nook Ideas
→ How To Build a Cozy Dad’s Retreat Patio Corner
→ 10 Father’s Day Gifts for Gardeners He Will Actually Love
Cut the timber this weekend. The bench will be in the garden before Father’s Day — and it will still be there in twenty years.