Clean garden edging is the single fastest way to make an entire yard look more professionally maintained — more impactful than new plants, a freshly mowed lawn, or even new mulch, because edging creates the crisp visual boundary between planted areas and lawn or path surfaces that signals deliberate garden design rather than casual maintenance. Garden edging ideas range from the completely free hand-cut trench edge through inexpensive steel and plastic systems to permanent stone and brick installations, and the right choice depends as much on the garden’s style as on the budget.
This guide covers the garden edging ideas that actually hold up in practice — organized by material and style, with specific guidance on installation, durability, and which garden and home styles each one suits best.
Table of Contents
Why Garden Edging Makes Such a Dramatic Difference
The reason edging produces such a disproportionate visual improvement relative to the effort involved is psychological as much as practical. A crisp boundary between lawn and planted areas tells the eye that the garden has been intentionally designed rather than allowed to happen — that someone made a decision about where the grass ends and where the planting begins. Without that boundary the eye reads the garden as a work in progress regardless of how mature and healthy the plantings are.
Edging also has a genuine practical benefit beyond appearance: it prevents grass from spreading into planted areas and reduces the maintenance required to keep the two zones separate over time. A garden bed with a physical edging barrier requires significantly less hand weeding at the boundary than one that relies on periodic re-cutting alone — the edging pays for itself in reduced maintenance within a single growing season.
The edging material choice affects both how long the crisp edge lasts before maintenance is needed and how the overall garden reads aesthetically. A metal edging in cor-ten steel holds its position for decades and develops a beautiful rust patina. A plastic edging at the budget end of the market holds its position for a few seasons before UV degradation and ground movement cause it to shift and deform. The investment in edging quality is one of the most direct garden investments available.
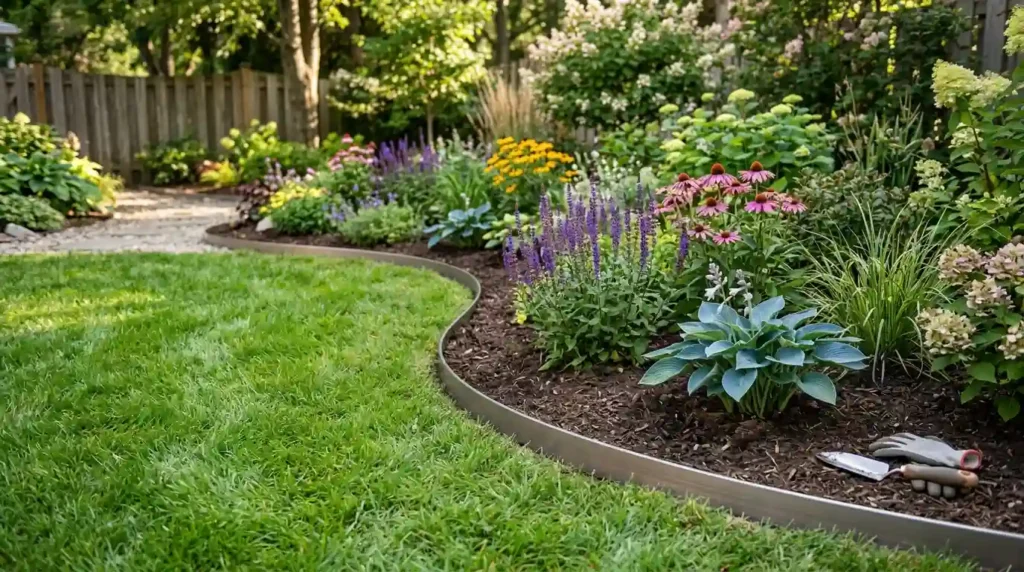
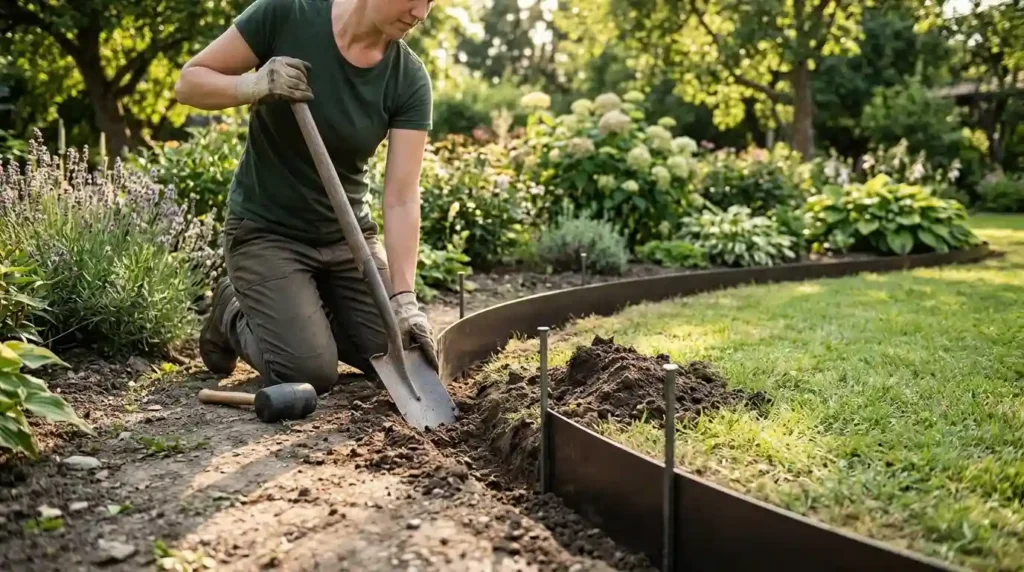
1. Steel Garden Edging for a Clean Modern Edge That Lasts Decades
✦ Best for: contemporary and modern gardens where a crisp minimal edge is the design goal
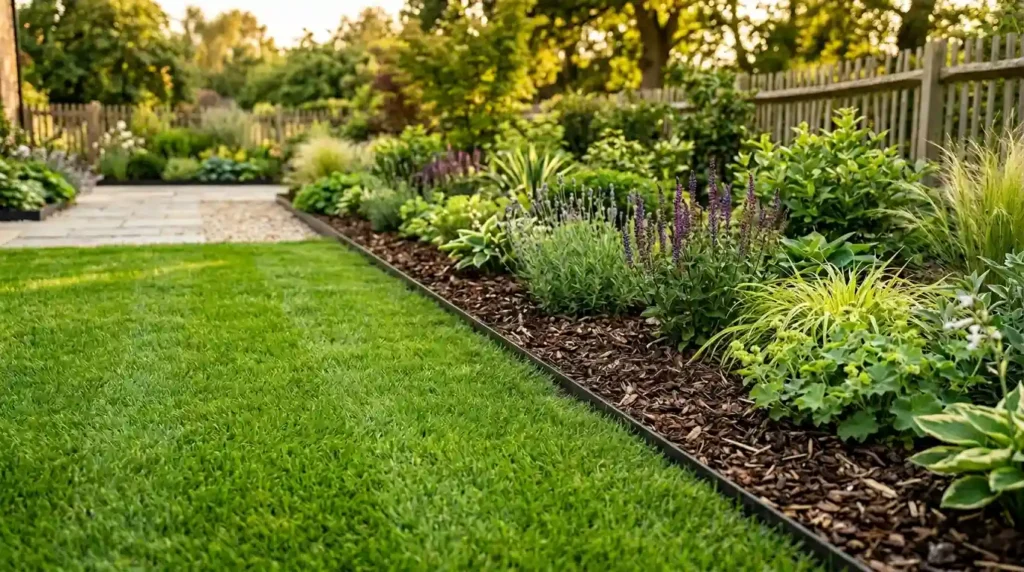
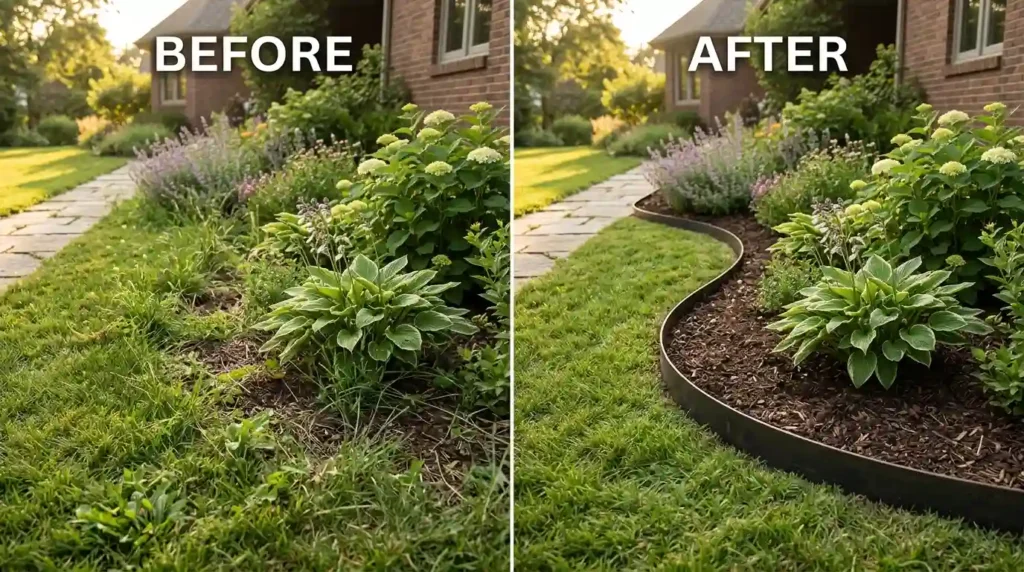
Thin steel edging strip installed flush with the soil surface creates the most refined and most permanent garden edge available — the same approach used by professional landscapers and garden designers for high-end residential projects because it is both visually minimal and structurally reliable across decades of freeze-thaw cycles and ground movement. The steel sits just at or slightly above soil surface level, creating a precise crisp line that is almost invisible from a distance while doing all of its physical work below the surface.
Cor-ten weathering steel develops a warm rust-orange patina after the first season of weather exposure — the same controlled rust surface used in sculpture and architectural cladding — that becomes richer and more beautiful over time rather than degrading. Standard mild steel edging can be powder-coated in black, green, or a natural metal finish for a more uniform appearance that does not change color over time. Both versions share the same structural permanence that makes steel the choice of professional landscapers.
Installation requires a flat-bladed spade or a dedicated edging tool to create a narrow trench at the bed boundary, the steel strip pressed into the trench with stakes driven at 18 to 24 inch intervals to hold it in position, and the soil pressed firmly back against both sides of the strip. The top edge should sit 1 to 2cm above the lawn surface so the mower wheel can run along it during mowing without the blade touching the steel.
Budget range: $1.50 to $4.00 per linear foot for steel edging depending on gauge and finish, making it mid-range in material cost but extremely competitive when lifetime cost is considered since a quality steel installation genuinely does not need replacement.
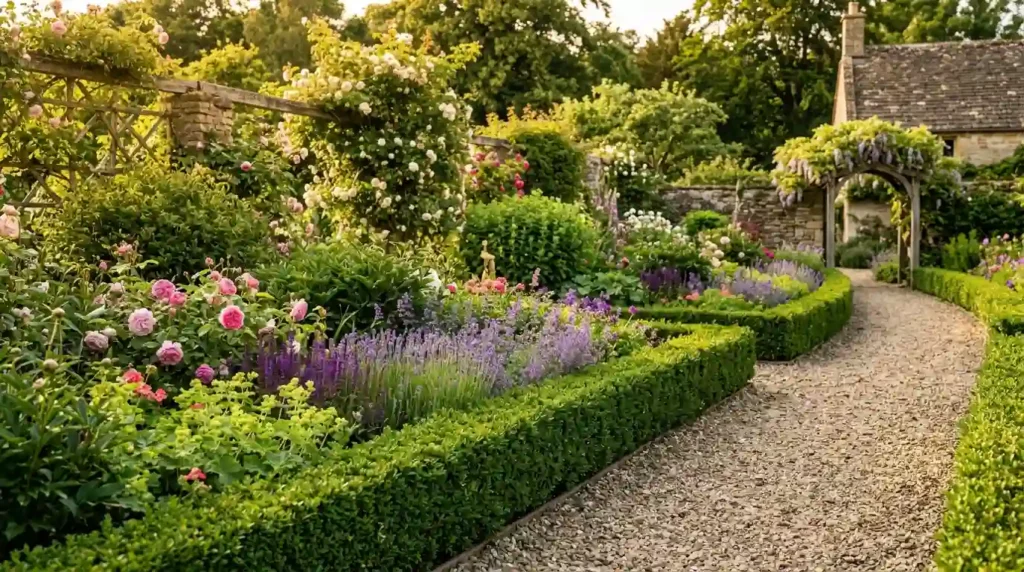
2. Brick Edging for a Traditional Garden That Improves With Age
✦ Best for: traditional, cottage, and formal garden styles where brick suits the overall material palette
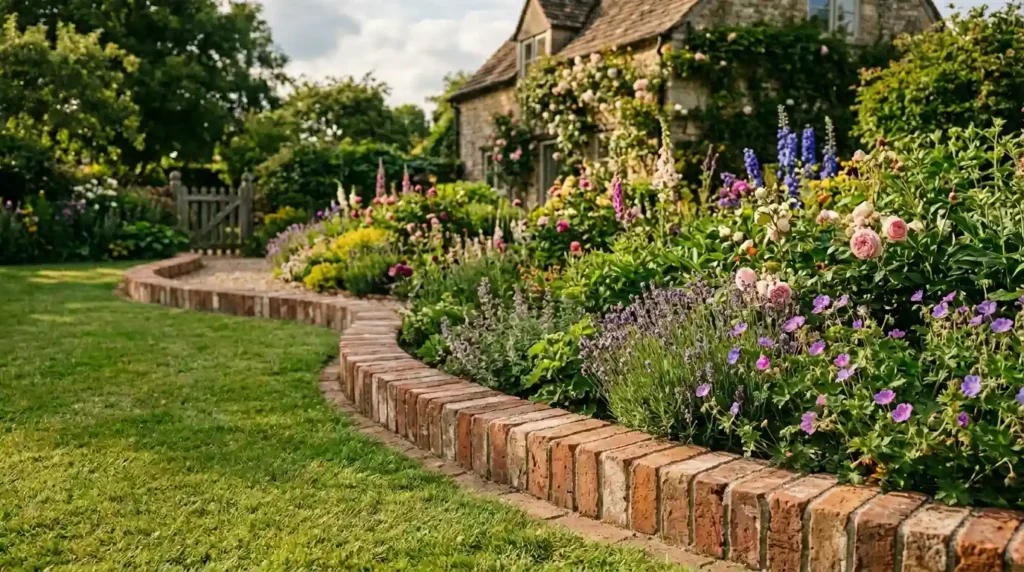
Brick garden edging is the material with the longest tradition in formal and cottage garden design — it appears in historic English kitchen gardens, in Victorian formal borders, and in American colonial gardens because it suits most architectural and landscape styles and genuinely improves in appearance as it ages and weathers. A reclaimed brick edging that has been in the ground for twenty years has a character that new brick never achieves regardless of how carefully it is installed.
Three installation orientations create different visual effects: bricks laid flat end-to-end create the widest and most stable border but require the most material. Bricks stood on their long side as a soldier course create a narrower, more vertical edge that reads as more formal. Bricks stood on their short end at a 45-degree angle create the classic sawtooth or dog-tooth edging associated specifically with Victorian kitchen gardens — the most decorative and most labor-intensive of the three approaches.
Reclaimed brick from salvage yards is more beautiful than new brick in garden edging applications because of its color variation, weathered texture, and aged surface. Budget $0.50 to $2.00 per brick depending on whether new or reclaimed, with reclaimed brick from the right source being more affordable than new while looking considerably better in a garden context.
3. Natural Stone Edging for an Organic Look That Suits Any Garden Style
✦ Best for: naturalistic, cottage, and informal garden styles where an irregular organic edge suits the planting character
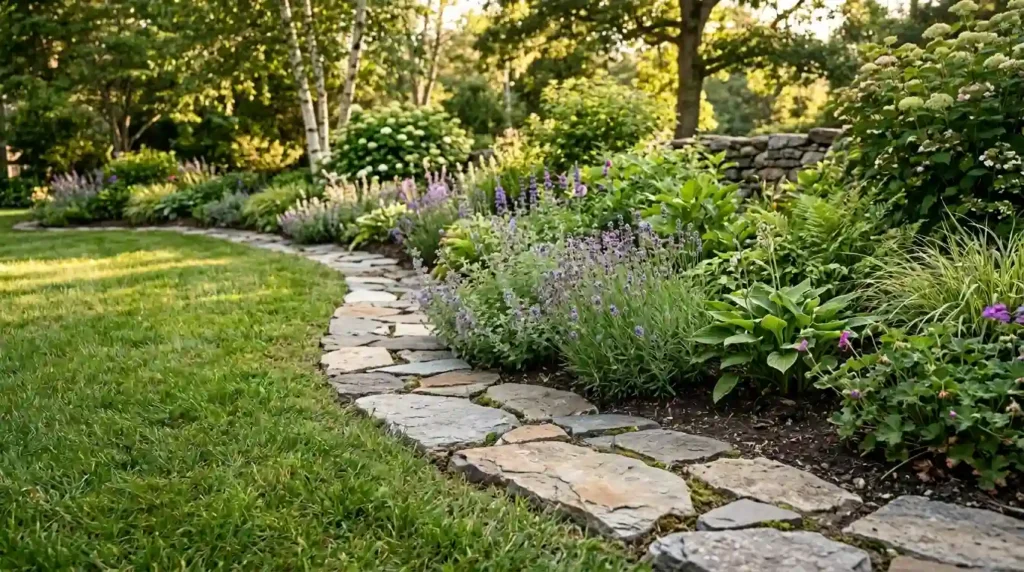
Natural stone edging — flat fieldstone, slate, limestone, or sandstone pieces set into the ground on edge — creates the most organic and most naturalistic boundary between lawn and planted areas because the slight irregularity of natural stone forms an edge that looks found rather than installed. This quality suits naturalistic and cottage garden planting styles better than the precision of steel or the formality of brick, and the stone itself improves in appearance as it weathers and develops moss and lichen growth over seasons.
The key installation decision with natural stone edging is depth below grade — stone set too shallow will tip and shift as the ground freezes and thaws through winter. At least one-third of each stone’s depth should be below grade for stability, with two-thirds below grade ideal for larger stones. Setting stones at a consistent height above grade — 2 to 3 inches is typical — creates the visual continuity that makes an irregular stone edging read as deliberate rather than randomly placed.
Cost varies enormously by stone type and source — local fieldstone collected or sourced from a nearby farm or quarry can cost as little as $0.10 per pound, while decorative cut stone from a landscape supplier costs $0.50 to $2.00 per pound. The most characterful and most cost-effective natural stone edging is almost always locally sourced stone that suits the regional landscape rather than imported decorative stone.
4. Wood Log or Timber Edging for a Rustic Garden Character
✦ Best for: woodland, rustic, and cottage gardens where natural timber suits the overall character
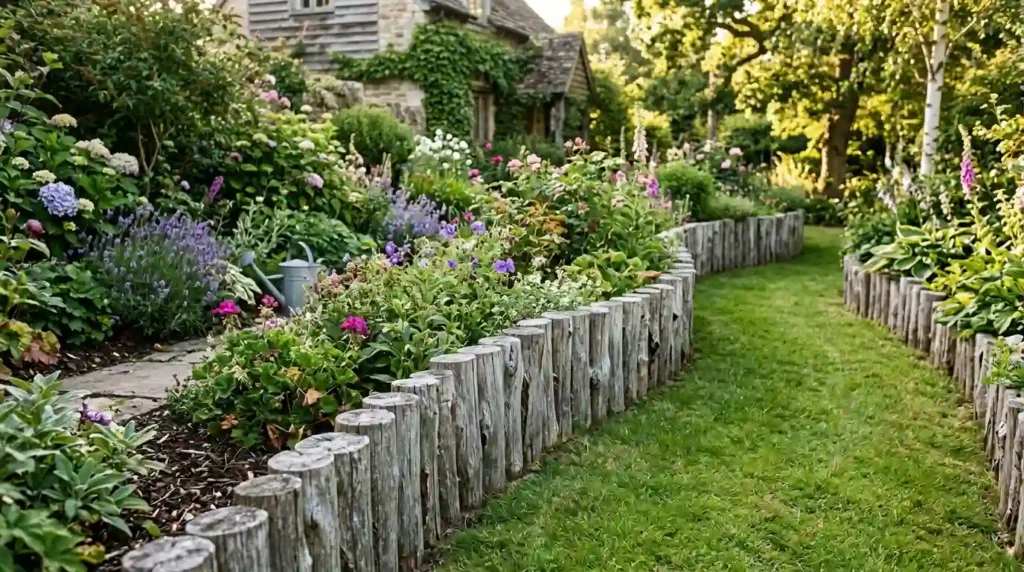
Wood log edging — sections of branch or small log cut to length and installed vertically as a border — is the most characterful and most genuinely rustic garden edging material available, and in the right garden it looks more natural and more beautiful than any manufactured alternative. The wood weathers to silver-gray over seasons, develops moss and lichen, and gradually decomposes back into the soil — a timeline that suits gardens designed to feel like they grew organically rather than were installed.
Durability is the honest limitation of wood log edging — even decay-resistant species like cedar and black locust will begin to deteriorate after 3 to 7 years in ground contact, and softer species may last only 2 to 4 years before the wood breaks down sufficiently to lose its structural integrity as an edging material. This makes log edging a medium-term solution rather than a permanent one, which suits gardens that evolve and change rather than gardens designed for permanence.
For a garden with access to pruned timber the cost of log edging is essentially zero — pruning from established trees and shrubs provides all the material needed. Purchased log rounds or timber stakes cost $0.50 to $2.00 per section depending on diameter and species. The natural variation in log diameter actually contributes to the rustic character rather than detracting from it.
5. Cheap Creative Garden Edging Ideas That Cost Almost Nothing
✦ Best for: budget gardens and temporary situations where cost is the primary constraint
Several genuinely effective garden edging solutions cost nothing or very close to nothing and look considerably better in practice than their zero cost would suggest. The hand-cut trench edge — a flat spade drawn along the bed boundary to create a clean vertical drop between lawn and bed — costs nothing and produces a crisp professional-looking edge that requires re-cutting only once or twice per growing season to maintain.
River stones as edging:
Large smooth river stones or cobbles placed in a continuous row along the bed boundary create a solid, heavy edging that stays in position without staking and looks genuinely attractive in naturalistic and coastal garden styles. Collected from a local stream or purchased in bulk from a landscape supplier at $30 to $80 per ton — enough for substantial edging coverage.
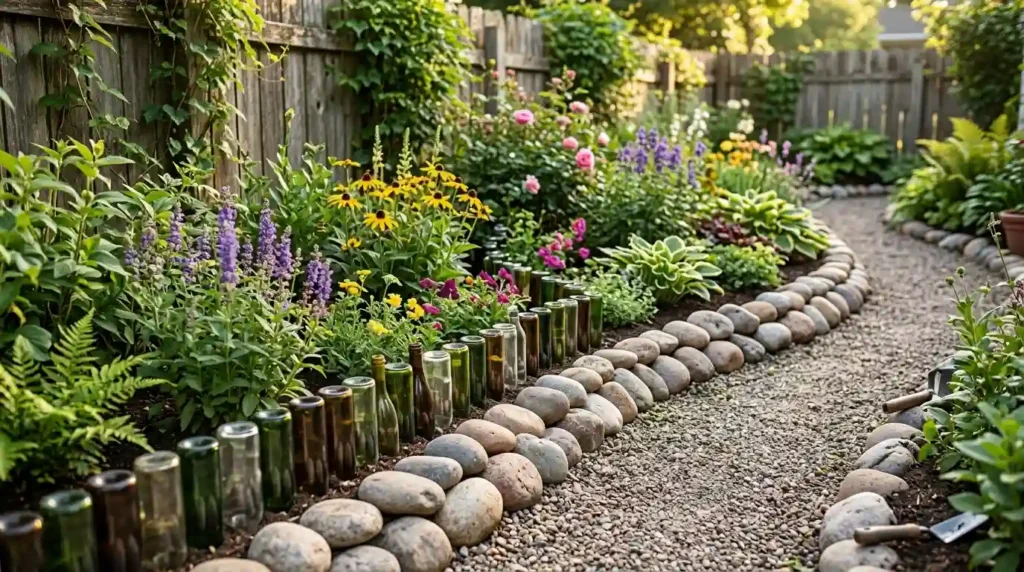
Recycled bottle edging:
Glass wine or beer bottles planted neck-down in a row create a surprisingly attractive decorative edging with a quirky handmade quality — the glass catches light and the uniform bottle forms create a distinctive visual rhythm. Green wine bottles create the most attractive edging; brown beer bottles work well in informal cottage gardens. The edging costs nothing beyond the time to collect and install the bottles.
Concrete paver edging: standard 12-inch square concrete pavers set on edge in a trench around a bed boundary cost $0.50 to $1.50 each and create a clean, durable, perfectly straight edge at a fraction of the cost of purpose-made edging products. The utilitarian appearance of a concrete paver suits vegetable gardens and working areas better than decorative borders, but in a practical kitchen garden context it is the most cost-effective permanent edging available.
6. Aluminum Landscape Edging for Curved Beds and Organic Shapes
✦ Best for: beds with curved or organic shapes where flexibility in the edging material is needed
Aluminum landscape edging is the most practical choice for garden beds with curved or flowing organic shapes because it bends freely to follow any curve radius without requiring heat or special tools — unlike steel which requires either a pre-curved section or a bending jig for tight curves. A single 16-foot length of aluminum edging can be bent by hand to follow the most complex curved bed shape and will hold that curve permanently once staked into position.
Aluminum does not rust and does not require any surface treatment for outdoor use — it oxidizes on the surface to form a natural protective layer that prevents any further corrosion. The color remains a consistent dull silver-gray rather than developing the warming patina of cor-ten steel, which suits contemporary garden styles better than traditional ones.
The installation technique that produces the cleanest result with aluminum edging for curved beds: use a garden hose laid on the lawn surface to define the desired curve before cutting any turf. The hose can be adjusted repeatedly until the curve looks right from all angles, then used as a cutting guide for the spade before the edging is installed. This approach produces smoother and more considered curves than cutting freehand.
7. Living Edging With Low Clipping Plants for a Softly Defined Border
✦ Best for: cottage, formal, and traditional gardens where a planted border edge suits the overall planting style
A low hedge of clipped plants as a garden border edge is the oldest garden edging solution and the one most inseparably associated with formal and cottage garden traditions. Clipped boxwood has defined the edges of knot gardens and parterres for centuries. Lavender edges cottage garden borders in the traditional English manner. Clipped germander, santolina, and catmint all provide similar living edging with different fragrance, flower color, and clip frequency requirements.
The practical consideration that determines whether living edging suits a specific garden: maintenance frequency. A clipped boxwood edge requires two to three clips per year to maintain its formal appearance. Lavender requires one hard cut per year after flowering. Clipped germander and catmint fall between the two. Any of these is manageable for a gardener who enjoys the process — and the result after clipping a living edge is one of the most satisfying single garden maintenance tasks available.
Note on boxwood blight: boxwood blight disease has significantly affected boxwood availability and suitability in many US regions over the past decade. Check local extension office guidance on boxwood blight pressure in your specific area before investing in a boxwood living edge — in high-pressure regions Japanese holly, Korean boxwood, or littleleaf boxwood offer blight-resistant alternatives with similar visual qualities.
How To Install Garden Edging Correctly the First Time
Step 1 — Define the line first:
Use a garden hose for curved lines or a string line stretched between stakes for straight edges to define the exact position of the edging before cutting any turf. Walk the full length of the intended edge and check it from the primary viewing angles before committing to the cut.
Step 2 — Cut the trench cleanly:
Use a flat spade or half-moon edging tool to cut a clean vertical trench along the defined line to the depth required by the chosen edging material — typically 4 to 6 inches for metal and plastic edging, deeper for stone or brick. The vertical face of the trench on the lawn side should be as clean and vertical as possible for the neatest finished result.
Step 3 — Set the edging at the correct height:
Metal and plastic edging should sit 1 to 2cm above the lawn surface so the mower wheel can run along the top of the edging during mowing without the blade reaching the material. Stone and brick edging set at lawn level creates a mowing edge that eliminates the need for a separate string trimmer pass along the bed boundary — one of the most practical advantages of solid material edging.
Step 4 — Backfill and compact firmly: Press soil firmly against both sides of the installed edging before adding any mulch or plants. Loose soil around new edging allows it to shift during the first rain and freeze-thaw cycle, which is the most common cause of edging that looks perfect on installation day and crooked within a month.
📌 More garden ideas: How To Build a DIY Garden Bench Dad Will Actually Use
Frequently Asked Questions
What is the best garden edging material?
The best garden edging material depends on the garden style and the priority between appearance, durability, and cost. For contemporary gardens prioritizing longevity steel edging is the best choice — it lasts decades, creates the crispest possible edge, and develops a beautiful patina over time. For traditional and cottage gardens brick or natural stone creates the most appropriate aesthetic. For curved beds aluminum is the most practical. For the lowest possible cost a hand-cut trench edge maintained twice per season is free and genuinely effective. According to the American Society of Landscape Architects, steel and aluminum edging have become the industry standard for professional landscape installations because of their combination of longevity, clean appearance, and installation reliability.
How deep should garden edging be installed?
Garden edging depth depends on the material and the root depth of the grass being contained. Most grass varieties spread via shallow runners that travel within the top 3 to 4 inches of soil, so edging that extends 4 to 6 inches below grade is sufficient to block lateral spread in most situations. For gardens with bermuda grass or other deep-rooting spreading varieties a depth of 6 to 8 inches provides better containment. Steel and aluminum edging is typically available in 4 and 6 inch depth versions — choose 6 inch for spreading grass varieties.
How do I keep garden edging from shifting?
Garden edging shifts for three main reasons: insufficient staking, loose backfill soil, and freeze-thaw ground movement in cold climates. Prevention: use stakes at 18-inch intervals for metal and plastic edging rather than the 24-inch intervals commonly suggested on product packaging. Backfill soil firmly on both sides of the edging before the first rain. In cold climates choose edging with a J-shaped or L-shaped bottom profile rather than a flat strip — the hooked bottom resists upward heaving during freeze-thaw cycles significantly better than a flat strip.
What is the cheapest garden edging option?
The cheapest garden edging options in order of cost: a hand-cut trench edge maintained with a flat spade costs nothing and produces a genuinely crisp result when done correctly. Glass bottles planted neck-down in a row cost nothing if bottles are available. River stones collected rather than purchased cost only the time to collect and install them. Purchased concrete pavers set on edge cost $0.50 to $1.50 per linear foot. Basic plastic edging strip costs $0.30 to $0.60 per linear foot. All five approaches can produce a clean garden edge at significantly lower cost than manufactured premium edging products.
More Garden Ideas
→ How To Build a Small Pond With a Waterfall
→ How To Build a Cozy Dad’s Retreat Patio Corner
→ Best Fast-Growing Trees to Plant With Your Dad This Weekend
Edge the beds before you plant anything new. The edging is what makes the planting look intentional — without it even the best plants just look like they grew there by accident.