Garden sleepers — the heavy rectangular timber pieces originally used as railway track supports — have become one of the most popular and versatile materials in garden design. They are strong, naturally durable, aesthetically beautiful, and compared to stone or brick they are remarkably affordable. More importantly they are accessible to the average homeowner without professional installation skills.
A single sleeper can define a garden border, create a step, form a raised bed, build a retaining wall, or serve as a simple rustic bench. Stack several together and the design possibilities multiply further. The warm natural wood tone of a fresh sleeper and the beautiful silver-grey patina of an aged one both work naturally with plants, gravel, stone and soil in a way that few manufactured materials can match.
Table of Contents
These 8 budget sleeper garden ideas will show you exactly what is possible this summer — from simple pathway edging to a complete tiered garden transformation.
A Quick Overview
🪵 8 budget sleeper garden ideas from simple edging to full tiered builds
💰 Honest budget estimates for every project
🔨 DIY-friendly builds that require no specialist skills
🔗 Products linked on Amazon throughout
1. Build Raised Planter Beds From Stacked Sleepers
✦ Raised Planter Beds
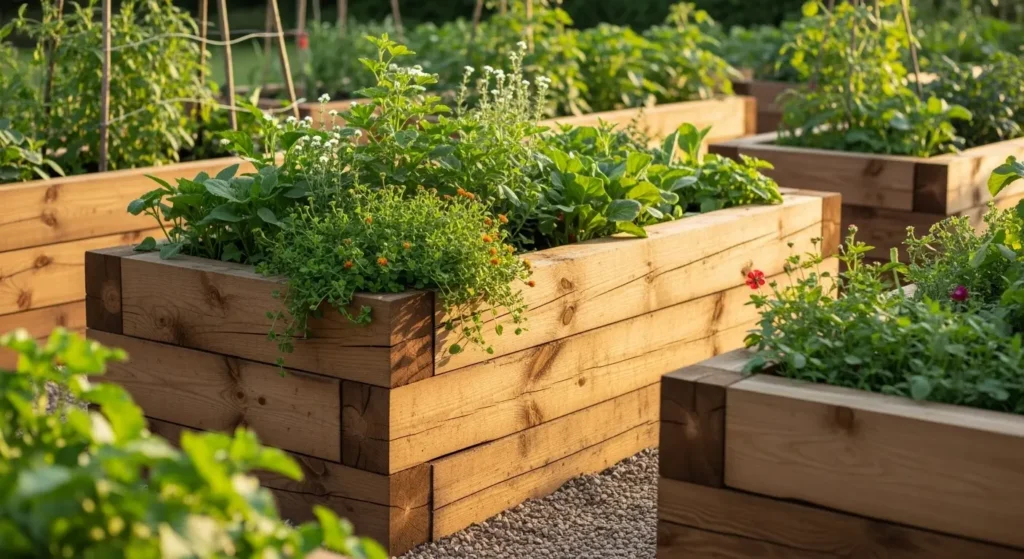
Raised planter beds built from stacked sleepers are the most popular sleeper garden project for good reason. The deep growing space, the natural wood aesthetic, and the clean defined edges combine to create a garden feature that looks both productive and beautiful. Stacked two or three sleepers high gives you 8 to 12 inches of growing depth — enough for most vegetables, herbs, and flowering perennials.
Stack sleepers in a rectangular formation, securing them at the corners with long timber screws or metal rebar driven through pre-drilled holes. Line the interior with landscape fabric before filling with quality growing compost. Two sleepers high creates a comfortable working height that eliminates the need to kneel for maintenance. A typical 6 by 3 foot sleeper raised bed costs approximately $60 to $120 in sleepers depending on whether you use new or reclaimed timber. The LANSOW solar spotlights positioned at the base of your raised beds illuminate them beautifully after dark. Find them linked on Amazon.
PRO TIP: Use new untreated oak or hardwood sleepers for raised vegetable beds rather than reclaimed railway sleepers. Old railway sleepers were often treated with creosote which can leach into soil and is not suitable for edible growing. New untreated hardwood is safe and still very affordable.
2. Create a Sleeper Retaining Wall to Manage Sloped Ground
✦ DIY Retaining Walls
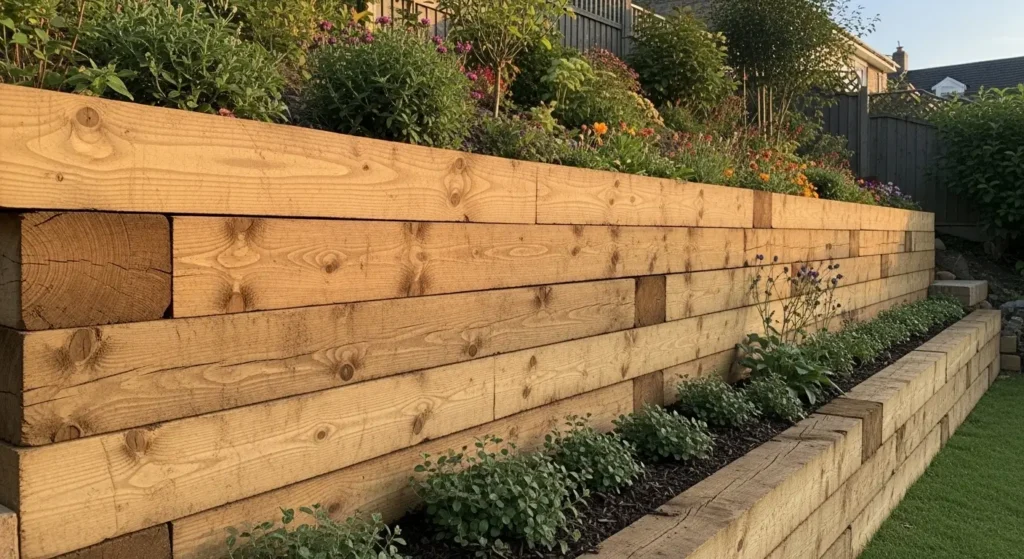
A sleeper retaining wall is the most practical sleeper garden project for gardens with any degree of slope. A sloped garden bank that is constantly eroding, difficult to maintain, and impossible to use productively is transformed by a sleeper retaining wall into a flat usable terrace above and a clean planted border below.
Lay sleepers horizontally against the slope with the front face exposed and secure them with vertical timber stakes driven into the ground behind. For walls over two courses high consult a structural guide to ensure adequate anchoring. A single-course sleeper retaining wall holding a shallow bank costs approximately $40 to $80 in sleepers and creates a permanent landscaping feature that adds significant structure to any sloped garden.
3. Use Sleepers as Pathway Edging for Clean Garden Lines
✦ Simple Pathway Edging
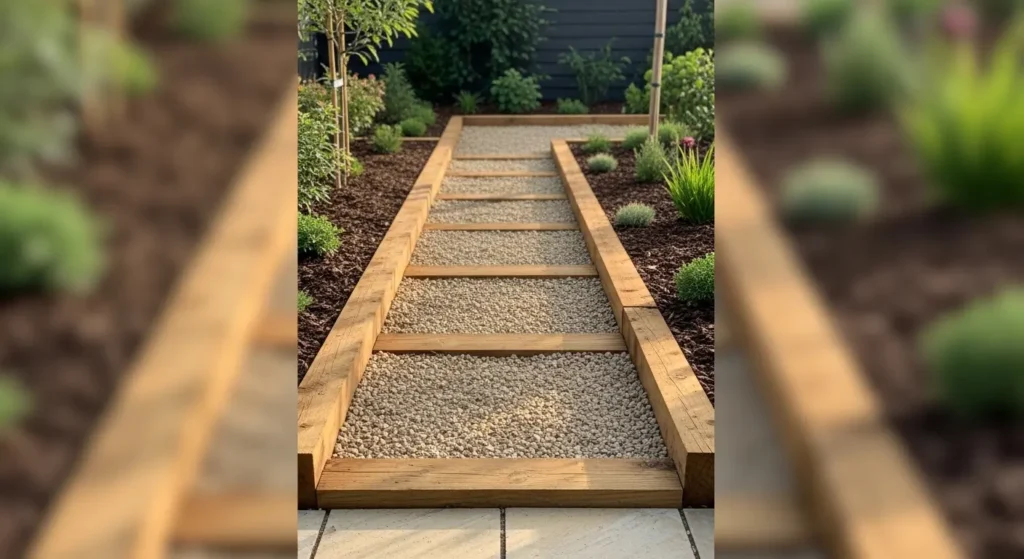
Sleeper pathway edging is the simplest and most affordable sleeper garden project. Laying sleepers flat on their sides along both edges of a garden path creates an instant clean defined border that separates the path surface from the planting beds beside it. The visual effect is immediate and the project can be completed in an afternoon.
Set sleepers into a shallow trench so their top surface sits level with or slightly above the path surface. Secure in position with timber stakes behind each sleeper. The flat top surface of horizontal pathway sleepers also functions as an occasional seating surface, a plant display ledge, and a boundary marker that makes mowing and path maintenance significantly easier. Total cost for edging a typical garden path is $30 to $60.
PRO TIP: Slightly offset the joint positions between adjacent sleepers rather than aligning all joints at the same point. Alternating joints like brickwork creates a stronger edging structure that resists movement from foot traffic and ground frost.
4. Build a Tiered Garden Using Sleeper Steps and Terraces
✦ Tiered Garden Levels
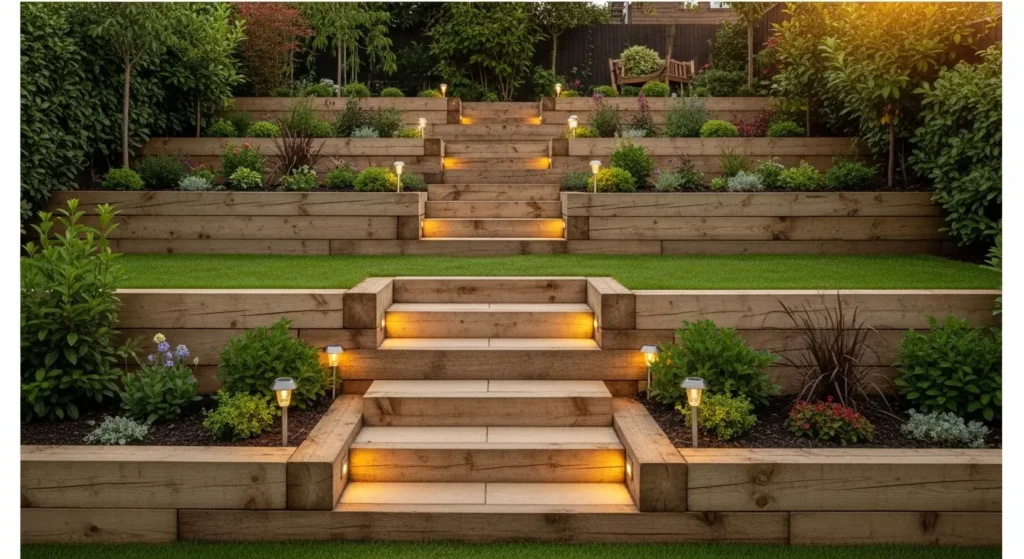
A tiered garden built from sleepers is the most transformative sleeper project possible. What begins as a problematic sloped garden that is difficult to plant and impossible to use comfortably becomes a series of flat productive terraces connected by solid sleeper steps — each level with its own purpose and planting scheme.
Build each terrace using sleeper retaining walls at the back and sides, filling the retained space with growing medium. Create sleeper steps between levels by setting individual sleepers into the slope at regular intervals with risers of approximately 6 inches. The VOOKRY Solar Watering Can Light placed on one of the upper terraces creates a beautiful focal point that can be seen from every level of the garden. Find it linked on Amazon.
5. Build a Simple Sleeper Bench for Instant Garden Seating
✦ Rustic Seating Bench
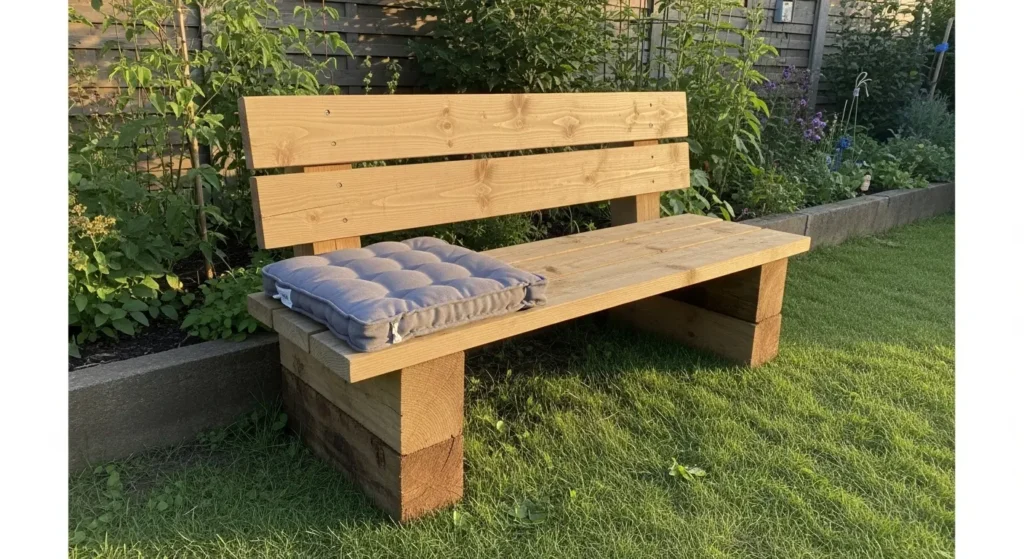
A sleeper bench is one of the most satisfying afternoon DIY projects in any garden. Two upright sleeper sections as legs with one horizontal sleeper as the seat — three pieces of timber and a handful of screws create a bench that looks completely at home in any garden style from contemporary to cottage.
Cut two sleeper sections to approximately 18 inches high for the bench legs. Position them 36 to 48 inches apart and secure a full-length horizontal sleeper across the top as the seat surface. Sand the seat surface smooth and seal with exterior wood oil for a comfortable seating surface. Add an outdoor cushion for extended sitting comfort. Total material cost is typically $30 to $50 for a full garden bench that will last many years.
PRO TIP: Position your sleeper bench so it faces your best garden view. A bench facing a beautiful planting border or a garden focal point like a solar light or water feature gets used far more than a bench that faces a fence or wall.
6. Frame Your Vegetable Garden With Sleeper Borders
✦ Vegetable Garden Frames
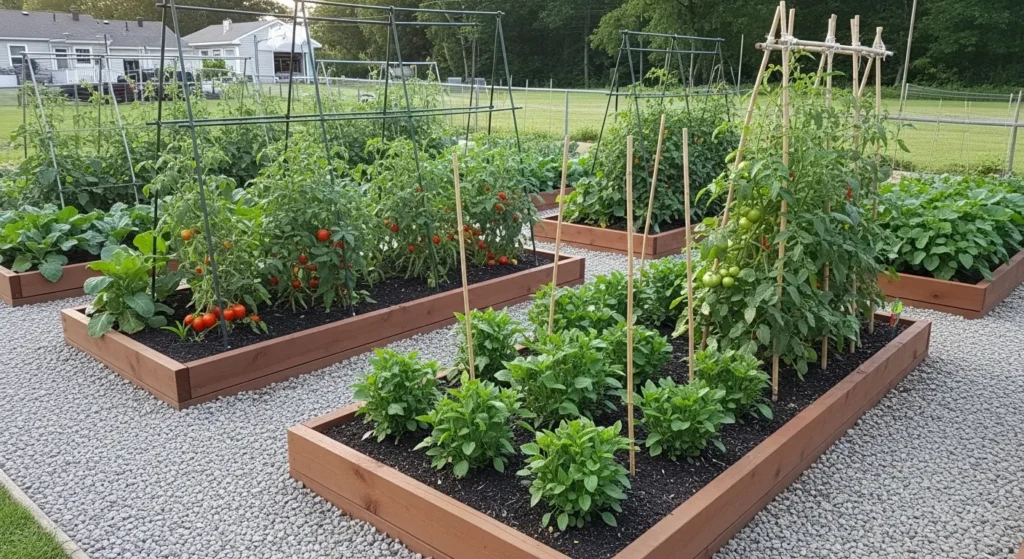
A vegetable garden framed with sleeper borders is both more productive and more beautiful than an unframed vegetable patch. The defined borders keep soil in place, prevent grass and weeds from encroaching into growing beds, create clear pathways between beds, and give the whole kitchen garden an organized structure that makes maintenance significantly easier.
Lay individual sleepers flat on the ground to define the perimeter of each growing bed. No digging or fixing required for a single-layer border — the weight of the sleeper is sufficient to hold it in position on flat ground. Create a simple grid of sleeper-framed beds with gravel or bark paths between them and the transformation from a random vegetable patch to a designed kitchen garden is immediate. The Quarut whiskey barrel planters work beautifully alongside sleeper frames for growing herbs and compact vegetables. Find them linked on Amazon.
7. Build a Sleeper Fire Pit Surround for a Defined Seating Area
✦ Fire Pit Surround Setup
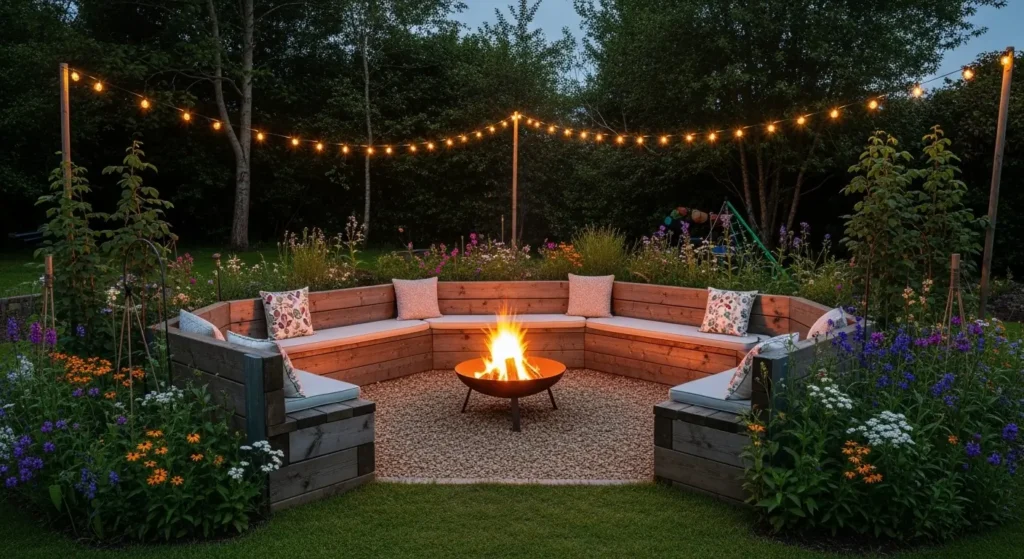
A sleeper fire pit surround creates the most natural and permanent outdoor seating area for fire pit use. Rather than repositioning chairs every time you light a fire the sleeper seating is fixed in place as a defined circle or square around the pit — creating a proper outdoor room that feels genuinely designed and intentional.
Position low sleeper bench sections in a circle or U-shape around your fire pit at a safe distance of at least 6 feet from the flames. Set each bench section into the ground slightly for stability. Add outdoor cushions on the seat surfaces. The addlon solar string lights strung between tree branches or posts above the seating area create a warm canopy overhead that complements the firelight beautifully. Find them linked on Amazon.
PRO TIP: Create your sleeper fire pit seating at two heights — lower sections close to the fire for direct warmth on cool evenings, and one or two higher sections slightly further back for guests who prefer a less intense heat position.
8. Use Sleeper Sections to Create Defined Borders in a Small Garden
✦ Small Space Border Design
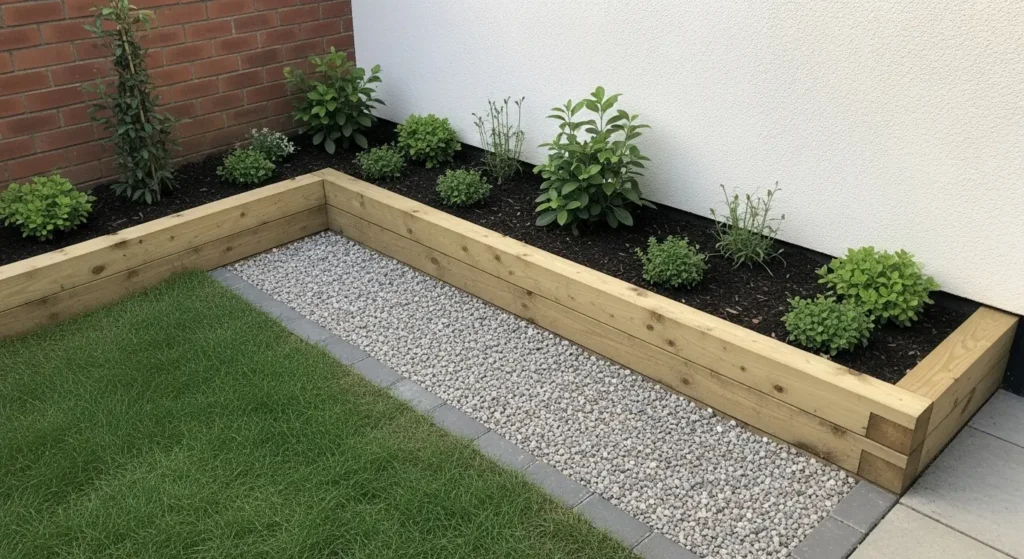
In a small garden sleeper border sections do more design work than almost any other single element. A clear defined border between a lawn or gravel surface and a planting bed immediately makes the whole garden look more intentional. The eye reads the defined edge as evidence of design thinking and the space feels more curated as a result.
Use short sleeper sections of 18 to 24 inches set into the ground at a slight angle to create a casual natural border edge. Alternatively lay full-length sleepers flat along the full border perimeter for the most clean and complete effect. Either approach costs under $40 for a typical small garden border and the improvement in how the garden looks and feels is immediate and significant.
Choosing the Right Sleepers for Your Project
Not all sleepers are equal. These five considerations will help you buy the right ones:
1. New vs reclaimed
New sleepers are cleaner, easier to work with, and essential for vegetable gardens. Reclaimed sleepers have more character and patina but may contain creosote treatment unsuitable for edible growing. Use reclaimed sleepers for decorative and structural projects only.
2. Hardwood vs softwood
Oak and other hardwood sleepers last significantly longer than softwood in outdoor conditions — typically 15 to 25 years versus 5 to 10 for untreated softwood. Hardwood costs more upfront but represents far better long-term value for permanent garden features.
3. Standard sizes
Standard garden sleepers are typically 8.5 feet long by 5 inches tall by 10 inches wide. This standard size makes planning and estimating straightforward — measure your project, divide by 8.5 feet, and round up for the number of sleepers needed.
4. Treatment and finish
New untreated hardwood sleepers can be left natural and will weather to a beautiful silver-grey over time. Apply a single coat of exterior wood oil on installation for a richer initial appearance. Avoid painting sleepers as the paint traps moisture and accelerates decay.
5. Weight and handling
A full-size hardwood sleeper weighs approximately 100 to 150 pounds. Always have two people available for handling and positioning. Never attempt to lift a full sleeper alone. A hired van or trailer is typically needed for transporting sleepers from the lumber yard.
5 Sleeper Garden Mistakes Worth Avoiding
These mistakes come up consistently in sleeper garden projects:
Mistake 1 — Using creosote-treated sleepers near edibles
Old railway sleepers treated with creosote should never be used for raised vegetable beds or herb gardens. Creosote compounds can leach into growing medium and enter edible plants. Always use new untreated hardwood for any project involving food growing.
Mistake 2 — Inadequate anchoring for retaining walls
Sleeper retaining walls that are not properly anchored into the slope behind them will eventually be pushed forward by soil pressure especially after heavy rain. Always use vertical deadman anchors — timber sections driven horizontally back into the slope at regular intervals — for retaining walls over one course high.
Mistake 3 — No drainage consideration in raised beds
Sleeper raised beds without drainage at the base cause waterlogging that kills plant roots. Always lay a layer of coarse gravel or broken crockery at the base of any raised sleeper bed before adding growing medium. Line the inside of the sleepers with landscape fabric to prevent soil loss while maintaining drainage.
Mistake 4 — Buying too few sleepers
Sleeper projects almost always require more material than the initial estimate suggests. Always add 10 to 15 percent to your calculated quantity before ordering. The cost of a second delivery trip to collect additional sleepers is always more than the cost of having a few left over.
Mistake 5 — Cutting without measuring twice
A mis-cut sleeper is expensive and difficult to fix. Measure every cut twice and mark clearly with a square before cutting. A chainsaw or circular saw with a long blade is the most effective cutting tool for sleepers — a standard handsaw will work but requires significant effort.
📌 More garden ideas → 12 Must-See Backyard Hardscape Ideas
Frequently Asked Questions
How much do garden sleepers cost?
New hardwood garden sleepers typically cost between $15 and $35 per sleeper depending on wood species, length, and supplier. Oak sleepers are at the premium end while treated softwood sleepers are more affordable. Reclaimed railway sleepers are often available for $10 to $20 each from salvage yards and landscape suppliers. According to the National Gardening Association raised bed gardening using sleepers is one of the most cost-effective ways to create a productive and attractive kitchen garden.
How long do garden sleepers last?
The lifespan of garden sleepers depends primarily on the wood species and treatment. Untreated oak hardwood sleepers typically last 15 to 25 years in outdoor conditions. Pressure-treated softwood sleepers last 10 to 15 years. Naturally durable species like cedar and redwood last 10 to 20 years untreated. Applying an annual coat of exterior wood oil extends the lifespan of any sleeper type by reducing moisture penetration and UV degradation.
Can I use old railway sleepers for a vegetable garden?
This depends on how the railway sleepers were treated. Older reclaimed railway sleepers were commonly treated with creosote which is not suitable for use adjacent to edible plants as it can leach into soil. More recently treated reclaimed sleepers may use different preservatives that are safer. The safest approach for vegetable gardens is always to use new untreated hardwood sleepers specifically sold for garden use. When in doubt ask your supplier about the treatment history of any reclaimed sleepers before using them for edible growing.
Do garden sleepers need to be fixed to the ground?
For single-layer applications like pathway edging and flat border definition the weight of a full-size sleeper is typically sufficient to hold it in position on flat ground without fixing. For any application where sleepers are stacked or used as retaining walls they must be fixed together with long timber screws and anchored to the ground with vertical rebar or timber stakes. Any sleeper retaining wall over one course high requires proper structural anchoring to resist soil pressure safely.
Start With One Sleeper This Weekend
Every sleeper garden project in this guide starts with one decision — which project fits your space, your budget, and what you need your garden to do this summer. Once that decision is made the rest is straightforward.
Pick the project that excites you most. Order your sleepers. Start this weekend. Railway sleepers have been building gardens for decades and the ones you lay this summer will still be looking beautiful when everything else in the garden has been replanted and redesigned.
All the products mentioned in this article are linked on Amazon. Every recommendation is something we genuinely believe in.
More Garden and Backyard Ideas
→ 7 Dream Backyard Ideas For Small Spaces
→ 25 Stunning Back Porch Patio Ideas
→ 12 Boho Garden Ideas You’ll Love
→ How To Build A Backyard Garden Bar At Home
These sleeper garden ideas prove that railway timber is the most versatile and affordable material for transforming any garden this summer. One weekend, one project, real results.