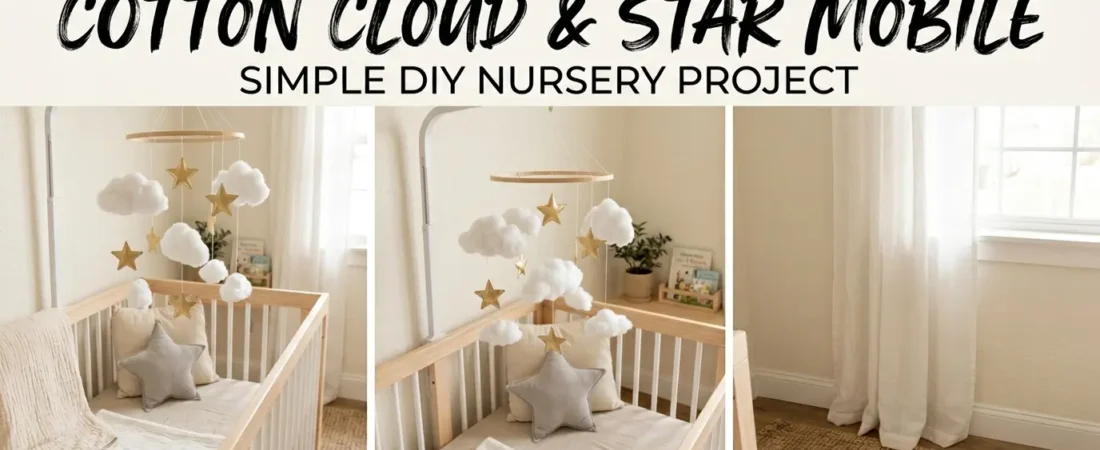
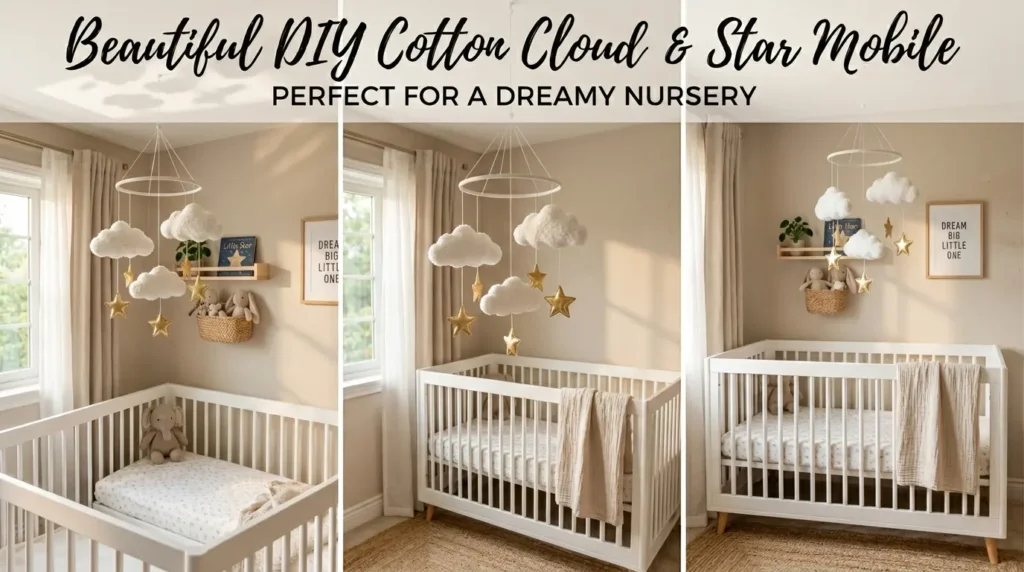
A cotton cloud mobile is one of the most beautiful and most achievable nursery or bedroom crafts available — soft white clouds and gold or silver stars suspended at different heights from a driftwood or dowel bar, catching the lightest air movement and creating gentle shadows on the ceiling above. This guide covers the complete build from shaping the clouds and cutting the stars to balancing the finished mobile so it hangs level and moves freely.
The cotton cloud mobile in this guide takes 2 to 3 hours to complete and costs under $20 in materials. The result is a decoration that looks like a carefully curated nursery purchase and is genuinely better because you made it.
Table of Contents
Materials You Need Before You Start

For the clouds:
Polyester fiberfill (craft stuffing) or cotton wool balls. White felt or white cardstock as the cloud backing. Hot glue gun and glue sticks. White thread or thin fishing line for hanging. A cloud template — trace a simple rounded cloud outline onto card and cut out, or search ‘cloud template printable’ online.
For the stars:
Gold or silver cardstock. A star template in two sizes — large stars (3 inches) and small stars (1.5 inches). Scissors or a craft knife and cutting mat. Optional: glitter glue or metallic paint for added sparkle.
For the hanging bar:
One piece of driftwood 12 to 18 inches long for the most natural aesthetic. Or a 12-inch length of 10mm wooden dowel painted white or left natural. Or a length of thin copper or brass tube for a contemporary metallic version.
For hanging:
Thin fishing line (monofilament) is the best hanging material — it is nearly invisible and allows the mobile elements to turn freely in air movement. White thread is the visible alternative that suits the aesthetic but creates more resistance to turning. Both work — fishing line is the better functional choice.
Step-by-Step Guide to Making the Mobile
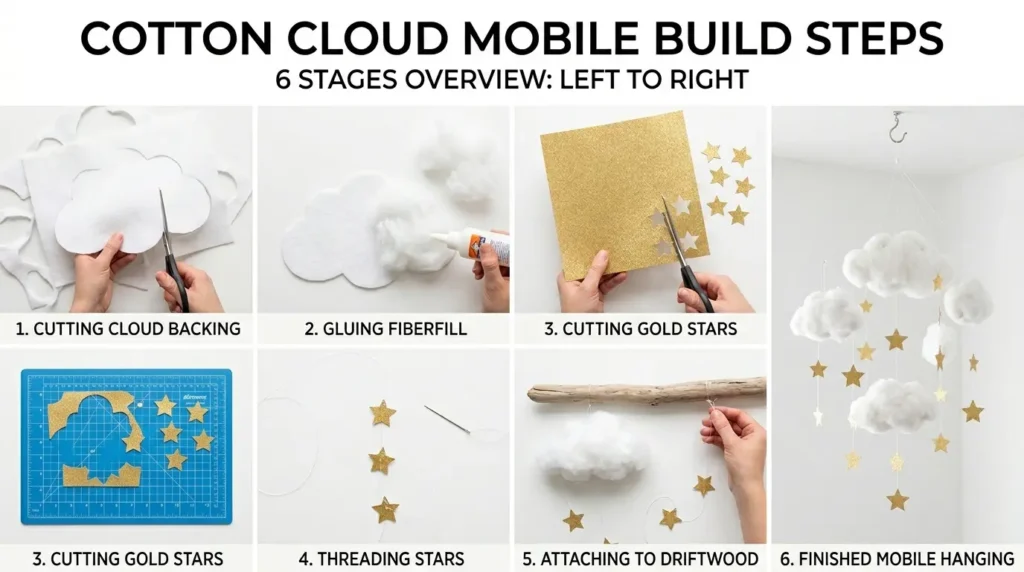
Step 1: Make the Cloud Backings
Trace your cloud template onto white felt or white cardstock and cut out three to five cloud shapes in different sizes — one large (5 to 6 inches wide), two medium (3 to 4 inches wide), and one to two small (2 to 3 inches wide). The size variation creates visual interest when the mobile is assembled. Cut each cloud backing cleanly — the edge becomes partially visible beneath the fiberfill and uneven cuts show.
White felt is the better cloud backing material because it has enough body to hold its shape and enough softness to blend with the fiberfill edges naturally. Cardstock backings create a slight stiffness that is visible at the cloud edges. Use felt for a softer more organic cloud form.
Step 2: Build Up the Cloud Shape With Fiberfill
Apply a thin layer of hot glue to the centre of the cloud backing. Press a handful of polyester fiberfill onto the glue and hold for 10 seconds. Build up the cloud shape by adding more fiberfill in the rounded sections — more at the top bumps, less at the flat base. Pull small sections of fiberfill apart with your fingers before applying to create soft fluffy edges rather than flat compressed surfaces.
The depth of the fiberfill determines how three-dimensional the cloud looks when hanging. A thin single layer creates a flat disc that reads as a cutout rather than a cloud. Building up 1.5 to 2 inches of fiberfill depth at the cloud centre creates the rounded puffy quality that makes the clouds look genuinely dimensional from every viewing angle.
Step 3: Cut the Stars
Trace star templates onto gold or silver cardstock and cut out 8 to 12 stars in two sizes — a mix of large and small stars creates more visual interest than all-identical stars along the hanging lines. For each star cut two identical pieces and glue them back to back around the hanging thread — the double-sided star shows the metallic finish from both sides as it rotates.
The double-sided star construction is the detail that makes star mobiles look professional. A single-sided star shows its plain card reverse when it rotates to face away from the viewer — the finished side only faces one direction. A double-sided star is always its best face regardless of which direction it turns.
Step 4: Thread the Hanging Lines
Cut fishing line or white thread into five to seven lengths ranging from 8 inches to 20 inches — the varied lengths create the different hanging heights that give the mobile its layered visual depth. Thread one or two stars onto each length by applying a dot of glue between the two star halves with the thread sandwiched between them. Tie a small knot at the base of each thread below the lowest star so the stars cannot slide down.
Plan the arrangement before gluing — lay the driftwood bar flat on the table and position the cloud and star threads along it at the intended hanging positions. Check the visual balance and the height variation before any thread is attached to the bar. Adjusting the arrangement at this stage is easy. Adjusting after attachment requires re-tying.
Step 5: Attach Threads to the Driftwood Bar
Tie each cloud and star thread to the driftwood or dowel bar at the planned positions. Secure each tie with a small dot of hot glue over the knot to prevent slipping. Space the attachment points unevenly along the bar — four threads clustered in the centre and one at each end creates more visual interest than evenly spaced attachments.
Attach the clouds first as the dominant visual elements. Then fill the spaces between clouds with star-only threads of varying lengths. A cloud at the left end, two clouds in the centre zone, one cloud at the right, and star threads at different heights between and below them creates the layered cloud-and-star composition that makes this mobile so visually appealing.
Step 6: Balance and Hang the Mobile
Cut a length of fishing line approximately 18 inches long for the hanging loop. Tie one end to the left end of the driftwood bar and the other end to the right end. Hold the loop at its midpoint and let the mobile hang — check whether the bar hangs level or tilts. If it tilts slide the hanging loop attachment point along the bar toward the heavier side until the bar hangs level.
A perfectly level hanging bar is the quality detail that distinguishes a professionally finished mobile from a homemade one. Take the time to find the exact balance point before fixing the hanging loop permanently. Once level secure the loop position with a small dot of hot glue and hang from a ceiling hook above the crib, bed, or display position.
Three Cotton Cloud Mobile Variations
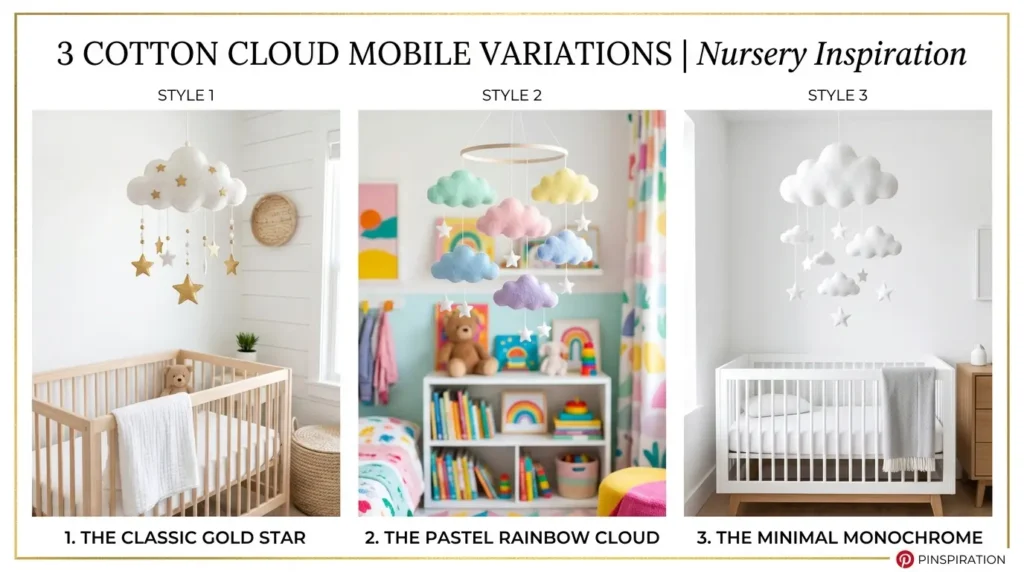
Rainbow Cloud Version
Make clouds from pastel-colored felt — soft pink, mint green, pale yellow, and lavender — instead of all white. Use white stars between the colored clouds. The rainbow cloud mobile suits colorful nurseries and children’s rooms where the all-white version feels too minimal. Keep the star color consistent in white or gold across all hanging lines to create unity within the varied cloud colors.
Minimal All-White Version
White clouds, white stars cut from white cardstock, and white thread on a white-painted dowel. The all-white mobile creates a purely textural and dimensional installation that suits Scandinavian, minimal, and neutral nursery aesthetics. The visual interest comes entirely from the dimensional quality of the fiberfill clouds and the subtle shadow they cast rather than from color contrast.
Moon and Star Version
Replace some or all of the clouds with crescent moon shapes cut from gold or yellow felt and stuffed with a thin layer of fiberfill. Mix moon and cloud shapes along the bar with stars between them. The moon and star combination suits a celestial nursery theme and the gold felt moon against white clouds creates a warm contrast that the all-white version does not provide.
Tips for a Professional Finish
Use fishing line not thread for the hanging strings
Fishing line is invisible at normal room viewing distances and allows each element to rotate freely with minimal resistance. Thread is visible and creates a slight drag that prevents free rotation. The invisible hanging strings create the illusion that the clouds and stars are floating independently rather than hanging from a visible structure.
Vary the hanging lengths significantly
The difference between the shortest and longest hanging thread should be at least 12 inches. A mobile where all elements hang at similar heights looks flat and two-dimensional. A mobile with a 6-inch cloud beside a 20-inch star thread beside a 12-inch cloud creates the layered three-dimensional quality that makes cloud mobiles so visually compelling from below.
Add a drop of essential oil to the fiberfill
One drop of lavender essential oil applied to the fiberfill inside each cloud before the final layer is glued in place creates a very subtle fragrance that releases gently when the mobile moves in air currents. The lavender scent is associated with calm and sleep — particularly appropriate for a nursery or bedroom mobile that moves above a sleeping child.
📌 More craft and decor ideas: How To Create Realistic Felt Flower Decorations
Frequently Asked Questions
How do you make a cloud mobile?
A cotton cloud mobile is made by cutting cloud shapes from white felt, building up polyester fiberfill on each backing to create dimensional puffy clouds, cutting double-sided stars from gold or silver cardstock, threading clouds and stars onto fishing line at varied heights, and attaching all threads to a driftwood or dowel bar. The bar is balanced by adjusting the hanging loop until it sits level. The complete process takes 2 to 3 hours and costs under $20 in materials.
What materials do you need for a cloud mobile?
The essential materials for a cotton cloud mobile are: white felt or cardstock for cloud backings, polyester fiberfill for building up cloud shapes, gold or silver cardstock for stars, fishing line for hanging, a hot glue gun and glue sticks, scissors, and a driftwood piece or wooden dowel as the hanging bar. Optional additions include glitter glue for sparkle on the stars, ribbon for decorating the bar, and essential oils for fragrance in the cloud fiberfill.
How do you balance a mobile so it hangs straight?
Balance a mobile by attaching a hanging loop to both ends of the bar and holding the midpoint of the loop to let the mobile hang freely. If the bar tilts slide the midpoint grip toward the heavier side until the bar hangs level. Once level mark the balance point with a small piece of tape, tie the hanging loop at that exact point, and secure with a dot of hot glue. The balance point is rarely the exact centre of the bar because the hanging elements are never symmetrically distributed.
Is a cloud mobile safe for a nursery?
A cloud mobile is safe for nursery use when hung at a height of at least 16 inches above the crib mattress surface — far enough that a standing child in the crib cannot reach the hanging elements. Use a secure ceiling hook rated for at least 5 pounds screwed into a ceiling joist rather than a plasterboard anchor. Check the mobile attachment points and hanging threads monthly for any signs of wear or loosening. A cloud mobile hung correctly above a crib is a safe and beautiful nursery decoration.
A Cotton Cloud Mobile Takes One Afternoon and Lasts for Years
Cotton cloud mobiles are the handmade decoration that people notice first in a nursery and ask about most consistently. The combination of soft dimensional clouds and gently turning stars creates a visual quality that no purchased mobile quite replicates — because the making shows in the result in the best possible way.
Make it this weekend. Hang it Monday morning. By Tuesday it will feel like it has always been there.
All the products mentioned in this article are linked on Amazon. Every recommendation is something we genuinely believe in.
More Craft and Decor Ideas
→ How To Make Fake Christmas Porch Candle Decorations
→ Candy Stick Decorations From Pipe Cleaners
→ 10 Cozy Christmas Living Room Ideas
By Tuesday it will feel like it has always been there.