Realistic felt flower decorations fool people. That is the point and the challenge. Anyone can cut a circle of felt and call it a flower. Making felt flowers that prompt guests to lean in for a closer look — that take the shape of a real petal, hold their curl, and carry the depth of color of a genuine bloom — requires understanding four specific techniques that most felt flower tutorials skip entirely.
This guide covers everything from choosing the right felt and tools to the shaping and assembly techniques that produce genuinely realistic results. Work through it once and the flowers you make afterward will look completely different from anything produced by standard craft tutorials.
Table of Contents
What Actually Makes a Felt Flower Look Real
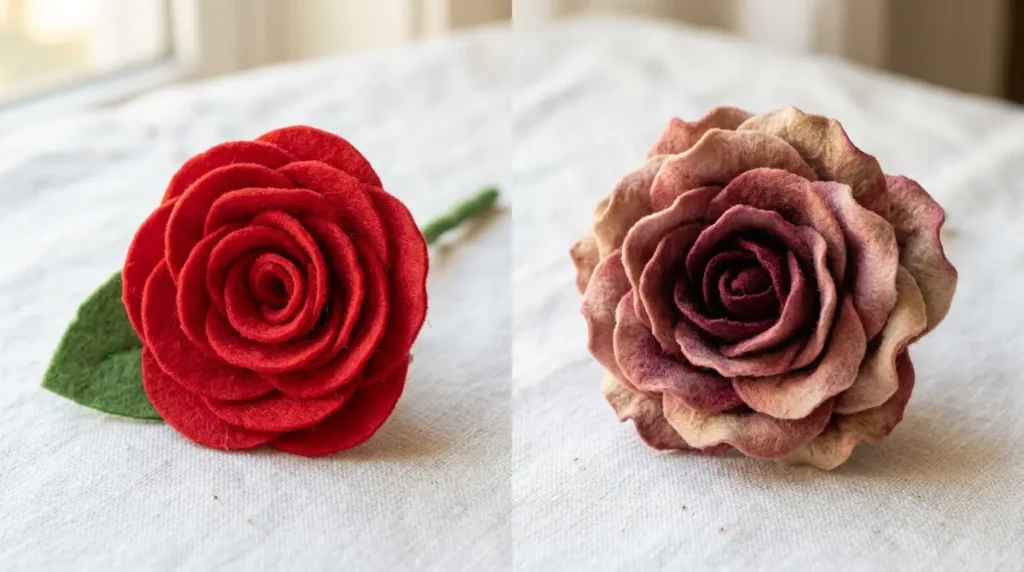
Most felt flowers look artificial because they are flat. Real flower petals are curved, cupped, ruffled, and layered in three dimensions. They have color variation, darker at the base, lighter at the tips, with subtle veining or streaking that no single-color piece of felt produces. They have imperfection, petals are not identical to each other and not symmetrically arranged.
Realistic felt flowers require three qualities that standard felt craft tutorials do not address: dimensional shaping through heat or steam, color depth through layering or shading, and structural variation between individual petals within the same flower. Get these three right and the material becomes secondary — the flower reads as real from any distance.
The techniques in this guide address all three. They add time to the making process — a realistic felt rose takes 45 minutes where a flat one takes 10. The result justifies every additional minute.
Materials: What You Need and Why Each Choice Matters
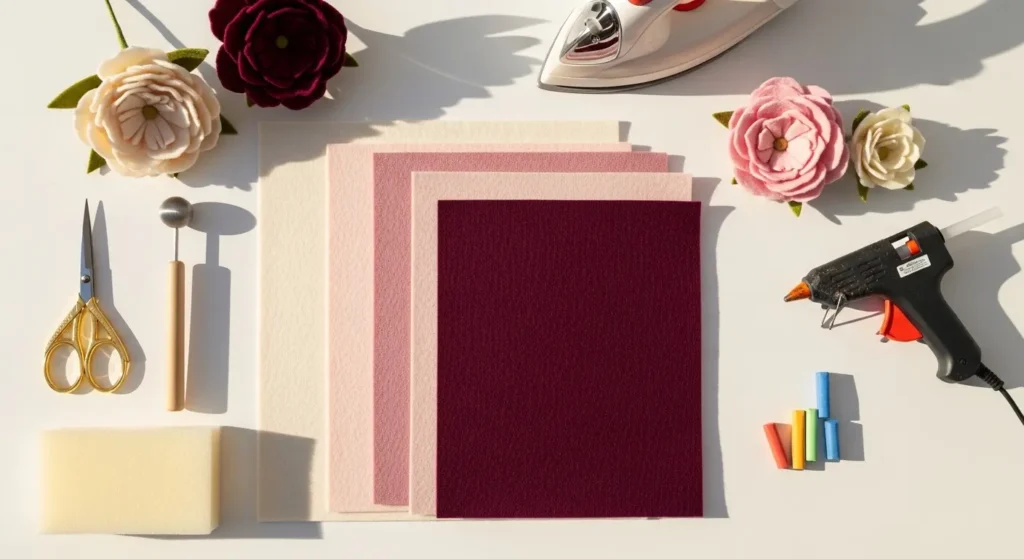
Felt Type
Wool felt or wool-blend felt
The only felt worth using for realistic flowers. Wool felt responds to heat and steam — it can be shaped, curved, and molded to hold three-dimensional forms permanently. It has a natural surface texture that catches light the way real petals do. It comes in the most nuanced color range. Wool felt costs more than acrylic felt but produces results that acrylic cannot match regardless of technique.
Acrylic craft felt
Available at every craft store and cheap. Does not respond to heat shaping — it melts rather than molds. Cannot be steamed into curves. Produces flat results regardless of cutting technique. Suitable for basic craft projects but not for realistic flower work.
Stiffened felt
Standard felt treated with a stiffening spray or solution. Holds sharp cut edges and maintains any shape it is dried in. Useful for petals that need to hold an extreme curve but less useful for the subtle natural curves of realistic flowers.
Essential Tools
Sharp embroidery scissors
Not craft scissors. Embroidery scissors with fine pointed blades cut clean precise curves without the fraying that dull or wide-blade scissors create on felt edges. The edge quality of cut petals is the most immediately visible quality indicator in a finished felt flower.
Wooden ball tools
Used for cupping and shaping petals on a foam pad. The rounded end pressed into the center of a petal and rotated creates the natural cup shape that makes felt flowers look three-dimensional.
Foam pad, hot glue gun, steam iron
The foam pad provides resistance for ball tool shaping. Low-temperature hot glue bonds petals without melting wool felt. A clothes steamer or steam iron relaxes wool fibers for permanent three-dimensional shaping.
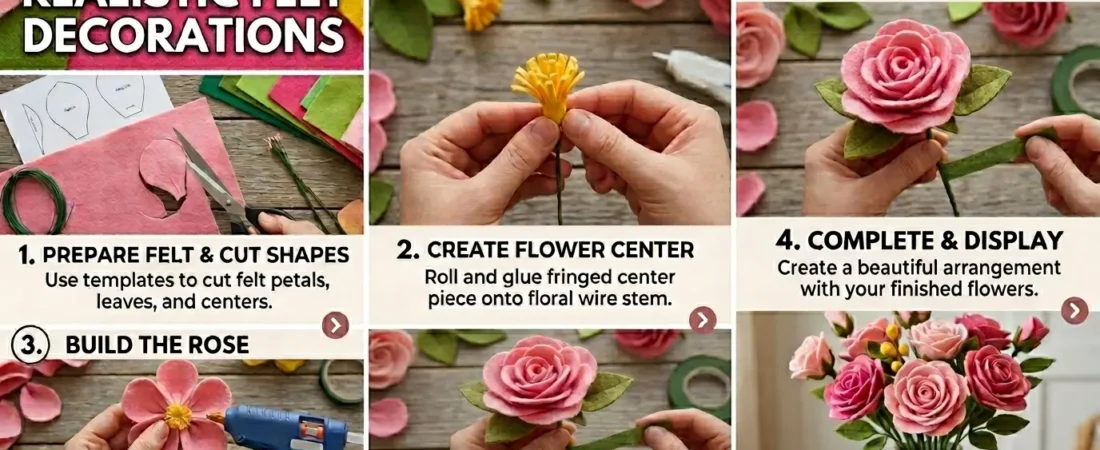
Step-by-Step: Making a Realistic Felt Rose
The rose is the most requested and most technically demanding felt flower. Master this and every other flower follows the same principles with variations.
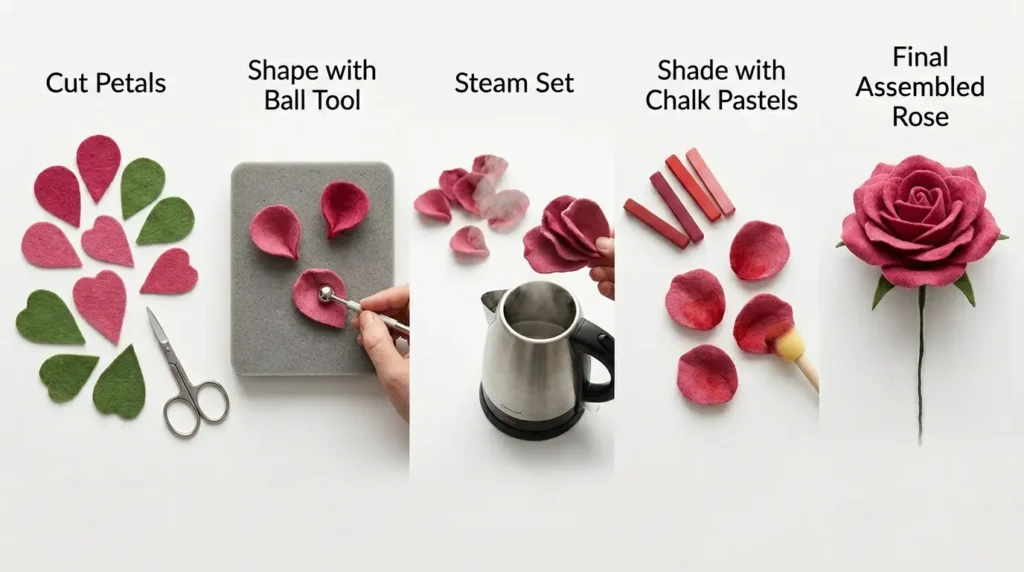
Step 1: Cut the Petals in Three Sizes
You need: 5 small petals (1.5 inches long), 7 medium petals (2 inches long), 5 large petals (2.5 inches long). Cut each petal in an elongated teardrop shape — wider at the base, tapering to a rounded point at the tip.
Cut each petal individually rather than stacking and cutting multiple layers together. Stacked cutting produces identical petals. Individual cutting produces the slight variations between petals that make a flower look natural rather than manufactured.
Step 2: Shape Each Petal With the Ball Tool
Place each petal face-down on the foam pad. Press the ball tool into the center of the petal and rotate in small circles with firm pressure. The petal will cup inward toward the tool. Increase pressure toward the base for a deeper cup at the base than at the tip.
For the outer large petals add a slight backward curl at the petal tips by rolling the tip gently around a pencil and holding for 10 seconds. Real rose outer petals curl backward away from the center — this detail is what makes observers question whether the flower is real.
Step 3: Steam Set the Shapes
Hold each shaped petal over steam for 3 to 5 seconds. While warm and relaxed from the steam hold the petal in the cupped shape and allow it to cool completely — approximately 30 seconds. The wool fibers reset in the shaped position as they cool.
Without the steam setting step the ball tool shaping partially springs back toward flat within hours. Steam setting locks the three-dimensional shape permanently — the petals maintain their cups and curls through years of display.
Step 4: Add Color Depth With Chalk Pastel
Apply a darker shade of your petal color in chalk pastel with a dry brush at the petal bases. Work the color from the base upward, fading before reaching the middle of the petal. Apply lighter color at the petal tips for varieties with lighter edges.
Chalk pastels are the most forgiving color medium for felt — they blend easily, can be partially removed if overdone, and do not stiffen the felt the way undiluted acrylic can. Fix with a light spray of hairspray or art fixative once shading is complete.
Step 5: Assemble From the Center Outward
Roll one small petal tightly into a cone and secure at the base with hot glue — this is the center bud. Glue remaining small petals around the bud, overlapping each by half and angling them inward. Add medium petals in a second ring at a wider angle. Add large petals in a final outer ring angled backward.
Glue each petal at the base only — never apply glue to the body or tip of the petal. Base-only gluing allows the petal bodies to float free and move slightly, which creates the natural movement quality that fully-glued petals lack.
Four More Realistic Felt Flowers Using the Same Techniques
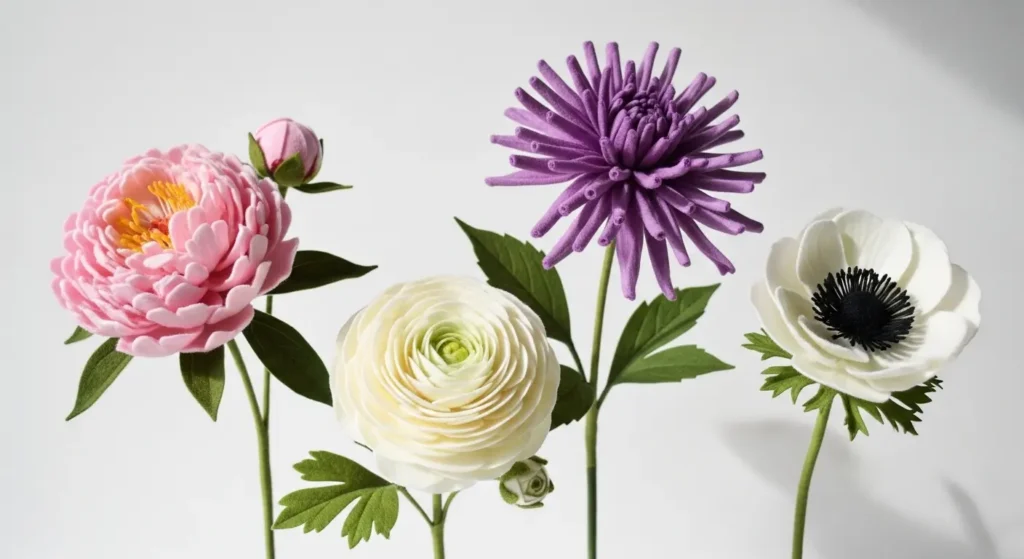
Peony
Use 25 to 30 petals of three sizes — peonies are densely packed. Cut petals with slightly ruffled edges by making small snips along the petal outline before shaping. Layer petals more densely than a rose with tighter overlap. Color from deep pink or burgundy at the base to pale pink or cream at the tips.
Dahlia
Cut long narrow pointed petals — dahlias have elongated tubular petals unlike the broad rounded petals of roses. Roll each petal into a gentle tube lengthwise before steam setting. Arrange in concentric rings with each ring’s petals centered in the gaps of the ring below.
Ranunculus
The ranunculus has 50 to 70 petals in a fully open bloom. Cut small rounded petals of very similar sizes. Use at least four shades of your chosen color from darkest at the center to lightest at the outside — the color gradient is the ranunculus’s defining visual quality.
Anemone
Five to eight broad rounded petals with a distinctive dark center. Cut the stamens from a small piece of black felt as a fringe circle — cut radial cuts from the outside almost to the center — and roll tightly. The fringe unrolls into a realistic stamen cluster. This is the recommended flower for beginners.
How to Display Felt Flower Decorations
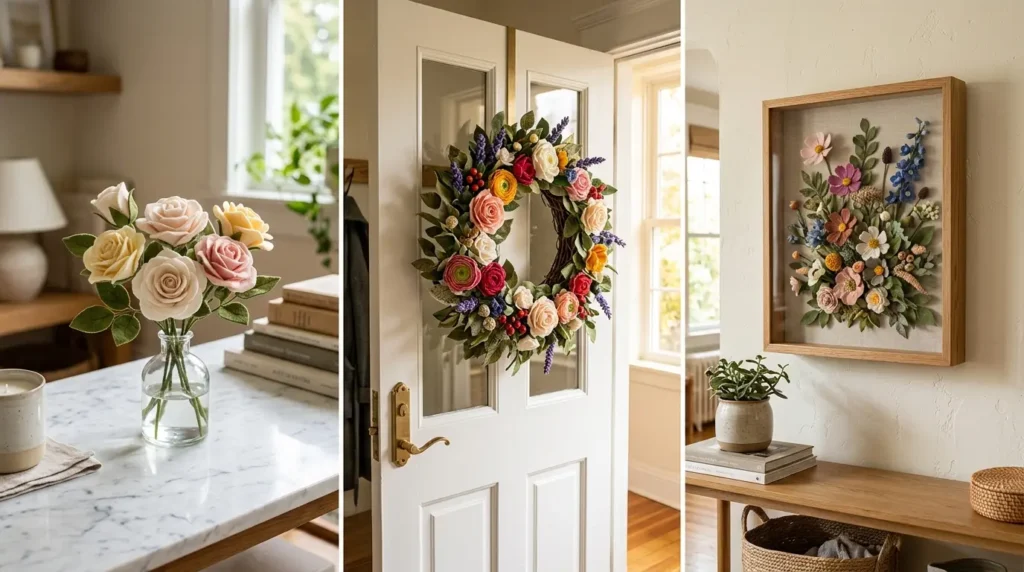
Bud vase arrangements
Wire stem each flower using floral wire wrapped with green floral tape. A bud vase arrangement of three to five felt flowers at different heights mimics a fresh flower arrangement closely enough that visitors only realize the flowers are felt when they touch them or notice they have not wilted after two weeks.
Wreath base
A grapevine or wire wreath base with felt flowers glued at intervals creates a permanent seasonal decoration that lasts indefinitely. Add felt leaves cut from green wool felt between the flowers to complete the natural floral wreath effect.
Framed botanical art
A shadow box frame with felt flowers and leaves arranged as a flat botanical illustration creates wall art with dimensional texture that printed botanical art cannot replicate. Position each flower face-forward and glue at the base only so petals project naturally forward from the backing.
Troubleshooting: Why Felt Flowers Look Fake and How to Fix It

Petals spring back flat after shaping
You are using acrylic felt or skipping the steam setting step. Wool felt steam set while held in position locks its shape permanently. Acrylic felt cannot be steam set and will always return toward flat.
Edges look ragged or frayed
Scissors are too large or not sharp enough. Switch to small pointed embroidery scissors. Running a fingernail lightly along cut edges after cutting compresses any minor fraying.
Flower looks too symmetrical and perfect
Real flowers are imperfect. Deliberately vary the angle of each petal during assembly. Offset some petals slightly higher or lower than their neighbors.
Color looks flat and one-dimensional
Add chalk pastel shading at the petal bases before assembly. Even a subtle darkening of 20% at the base creates the color depth that makes felt flowers look painted rather than cut from a single sheet.
📌 More craft and decor ideas →13 Spring Centerpiece Ideas That Wow Guests
Frequently Asked Questions
What type of felt is best for making flowers?
Wool felt or wool-blend felt with minimum 30% wool content is the only felt that produces realistic flower results because it responds to steam shaping. Pure acrylic craft felt cannot be steam shaped and produces flat results regardless of cutting technique. Use 1mm to 1.5mm weight for best results.
How do you make felt flowers look realistic?
Four techniques produce realistic felt flowers: ball tool cupping on a foam pad, steam setting the shaped petals while held in position, chalk pastel shading at petal bases, and asymmetric assembly that introduces natural imperfection. The most impactful single technique is ball tool cupping — a flat petal never looks real regardless of anything else applied to it.
How long do felt flower decorations last?
Properly made wool felt flowers last indefinitely when kept out of direct sunlight and away from moisture. Chalk pastel shading fixed with art fixative spray is lightfast for 5 to 10 years in indoor display conditions.
Can beginners make realistic felt flowers?
Yes — start with the anemone rather than the rose. The anemone has the fewest petals, the simplest petal shape, and the most forgiving assembly. A first-time maker who follows the shaping and steam setting steps produces a convincing anemone in under 30 minutes.
The Moment a Felt Flower Fools Someone Is Worth Every Extra Minute
Every additional technique in this guide adds time to the making process. Combined they add 30 to 40 minutes to a flower that the standard approach makes in 10. The result is a flower that someone picks up to smell before realizing it is felt. That moment is the standard this guide is written for.
Start with the anemone. Master the shaping and steam setting on a simple flower before attempting the rose. By the third flower the techniques become instinctive. By the tenth flower you will be teaching others.
All the products mentioned in this article are linked on Amazon. Every recommendation is something we genuinely believe in.
More Craft and Decor Ideas
→ 10 Thoughtful Gifts Every Gardener Will Love
→ 9 Beautiful Spring Floral Arrangements
→ 11 Beautiful Spring Porch Decorations For Your Home
→ 12 Front Porch Ideas That Instantly Wow
Start with the anemone. By the tenth flower you will be teaching others.