Butterfly suncatchers are one of the most rewarding window crafts available — the combination of light refracting through colored glass, beads, or resin and the delicate butterfly form creates decorations that look genuinely beautiful at any time of day and magical when afternoon sunlight hits them directly. Unlike many craft projects butterfly suncatchers improve with sunlight rather than fading in it.
This guide covers four butterfly suncatcher techniques at different skill levels and material costs — a beginner beaded wire version, a melted bead version, a resin and pressed flower version, and a stained glass effect version using tissue paper and contact adhesive. Every technique produces genuinely beautiful results from the very first attempt.
Table of Contents
Materials Overview for Each Butterfly Suncatcher Technique
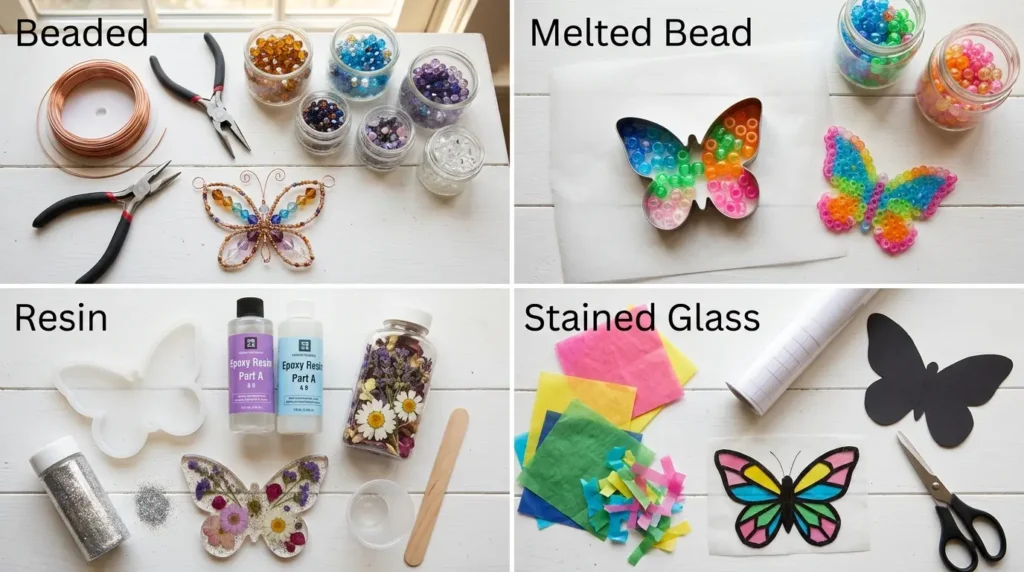
Technique 1 — Beaded wire butterfly:
26-gauge copper or silver craft wire. Crystal or glass seed beads in transparent colors — blue, purple, pink, and clear. Wire cutters and round-nose pliers. Fishing line or nylon thread for hanging. Total cost under $8.
Technique 2 — Melted bead butterfly:
Transparent plastic pony beads or Perler beads in multiple colors. Baking paper. A butterfly-shaped cookie cutter or hand-drawn butterfly template. An oven. Fishing line for hanging. Total cost under $5.
Technique 3 — Resin and pressed flower butterfly:
Clear UV or two-part resin. Butterfly-shaped silicone mold. Pressed flowers and leaves. Resin dye in transparent colors. UV lamp or sunlight for curing. Fishing line for hanging. Total cost $15 to $25 depending on resin kit.
Technique 4 — Stained glass effect butterfly:
Clear contact adhesive paper or self-adhesive laminating sheet. Tissue paper in multiple colors. Black permanent marker or black card for outlines. Scissors. Fishing line for hanging. Total cost under $3 — the most budget-friendly technique.
Technique 1: Beaded Wire Butterfly Suncatcher
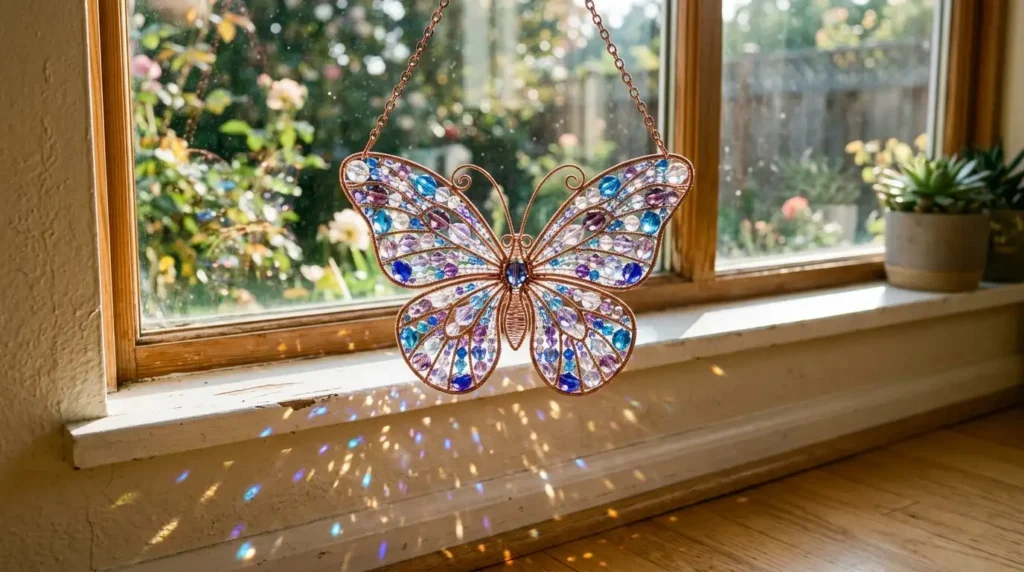
Step 1: Shape the butterfly wing frames
Cut four pieces of 26-gauge wire — two at 12 inches for the upper wings and two at 8 inches for the lower wings. Using round-nose pliers form each wire piece into a teardrop or wing shape — bend the wire into the outline of one butterfly wing, bringing both ends together at the inner wing point where it joins the body. Twist the two ends together twice to secure the wing shape.
The upper wings should be slightly rounder and larger than the lower wings — this proportional difference is what makes the wire butterfly immediately recognizable as a butterfly rather than an abstract shape.
Step 2: Fill the wings with beads
Cut a long piece of thinner 28-gauge wire — approximately 24 inches. Thread a bead onto the wire and begin weaving it across the wing frame in a grid or spiral pattern, threading beads onto each pass and wrapping the wire around the frame wire to anchor each row. Fill the wing completely with beads so no gap larger than one bead width remains. Secure the end by wrapping the wire tightly around the frame wire three times.
Use a gradient color approach for the most beautiful result — darker tones at the wing edges fading to lighter or clear beads toward the center creates the specific iridescent quality of real butterfly wings.
Step 3: Assemble the butterfly and add the body
Hold all four wings together at their inner points — two upper and two lower wings meeting at the center body position. Wrap a 6-inch piece of wire tightly around all four joining points to create the butterfly body. Thread three large beads onto the body wire for a beaded body effect before wrapping the final end. Bend two short antennae pieces upward from the top of the body and add a tiny bead to each tip.
Attach a 6-inch length of fishing line to the top of the body between the antennae for hanging. The completed beaded wire butterfly suncatcher catches light through every bead and creates scattered colored reflections on surrounding surfaces in direct sunlight.
Technique 2: Melted Bead Butterfly Suncatcher
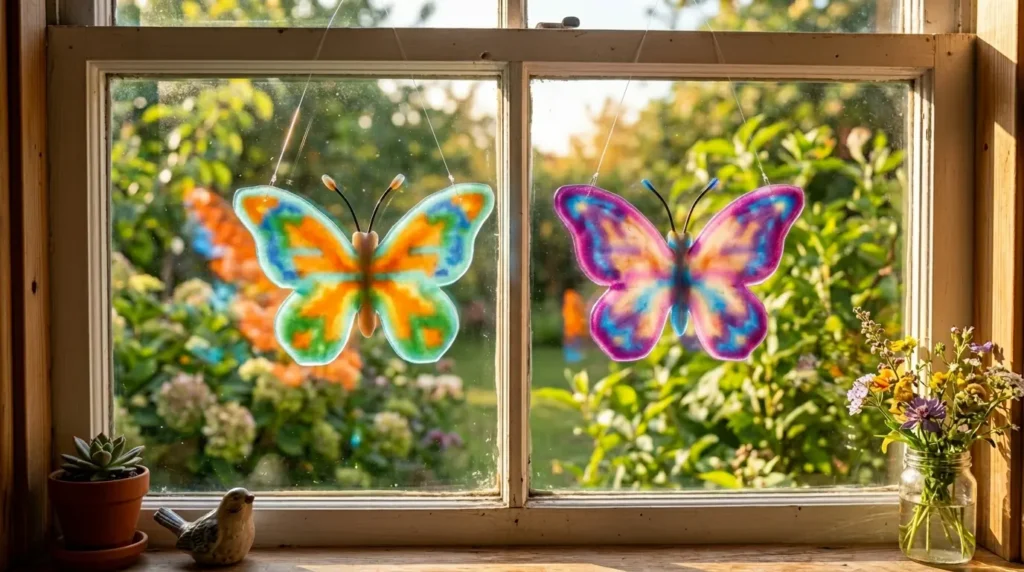
The melted bead technique uses heat to fuse transparent plastic pony beads into a solid translucent panel — the fused beads create a stained glass quality that is the most effective light-refracting technique of all four methods and requires no prior craft skill.
Step 1: Arrange beads in the butterfly shape
Line a baking tray with baking paper. Place a butterfly-shaped cookie cutter on the baking paper. Fill the cookie cutter interior completely with transparent pony beads standing upright — pack them tightly in a single layer so every bead touches its neighbors. Use multiple colors arranged in a pattern — gradient from wing tip to center, spotted pattern mimicking real butterfly wing markings, or abstract color bands.
Step 2: Melt the beads in the oven
Preheat the oven to 400 degrees Fahrenheit. Place the tray with the beads in the oven and bake for 20 to 25 minutes until the beads have fully melted and fused together into a solid flat panel. The beads will melt down to approximately half their original height and fuse at their contact points. Remove from the oven and allow to cool completely — minimum 30 minutes — before removing the cookie cutter.
The melting process produces a small amount of plastic fume — work in a well-ventilated kitchen with an open window or extractor fan running. The fumes are not toxic at this temperature but the smell is strong.
Step 3: Add the hanging loop
While the fused bead panel is still slightly warm but handleable press a small loop of fishing line into the top edge of the butterfly body area — the fishing line embeds into the slightly soft plastic and holds permanently as it cools. Alternatively drill a small hole at the top of the cooled panel and thread fishing line through it. Hang in a sunny window for the full stained glass light effect.
The melted bead butterfly in direct afternoon sunlight casts colored light pools on walls, floors, and curtains — the specific beauty of this technique that no photograph fully captures until it is seen in person.
Technique 3: Resin and Pressed Flower Butterfly Suncatcher
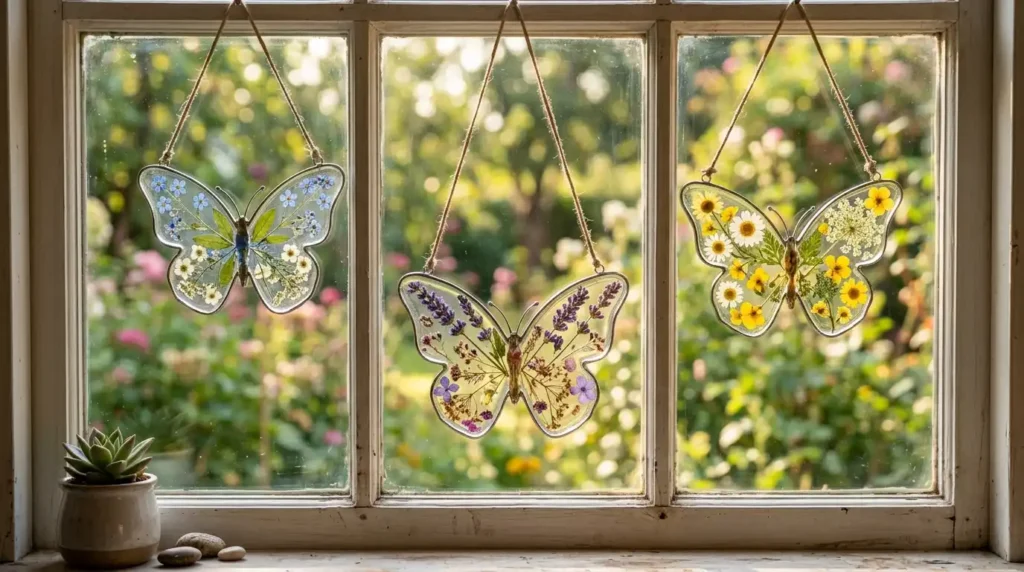
The resin technique produces the most premium-looking butterfly suncatcher — real pressed flowers suspended in clear resin create a completely unique decoration that genuinely looks like a high-end craft purchase.
Step 1: Prepare pressed flowers
Press small flowers between heavy books for 2 to 3 weeks until completely flat and dry. The best flowers for resin suncatchers: small pansies, forget-me-nots, lavender, tiny daisies, and individual flower petals. Flowers must be completely dry before going into resin — any moisture causes bubbling and cloudiness in the finished piece.
Step 2: Pour the first resin layer
Mix the resin according to manufacturer instructions — two-part resin requires precise 1:1 or 2:1 ratio mixing and exactly 3 minutes of stirring. Add transparent resin dye if desired. Pour a thin first layer into the butterfly silicone mold — approximately 3mm deep. Use a toothpick to pop any surface bubbles. Allow to partially cure until the surface is gel-like but not fully hard — approximately 2 to 4 hours depending on the resin brand.
Step 3: Add flowers and seal with second layer
Arrange pressed flowers face-down on the gel layer of resin — face-down means they will face upward when the mold is released. Press each flower gently into the gel surface so it adheres without sinking completely. Mix and pour a second resin layer to cover the flowers completely. Pop bubbles and allow to cure fully for 24 to 48 hours before releasing from the mold.
Release the cured butterfly from the mold by gently flexing the silicone. Drill a small hole at the top of the butterfly body and thread fishing line for hanging. The finished resin butterfly suncatcher is completely waterproof and UV-stable — it can be hung in a south-facing window indefinitely without yellowing or fading.
Technique 4: Stained Glass Effect Tissue Paper Butterfly (Easiest — Any Age)
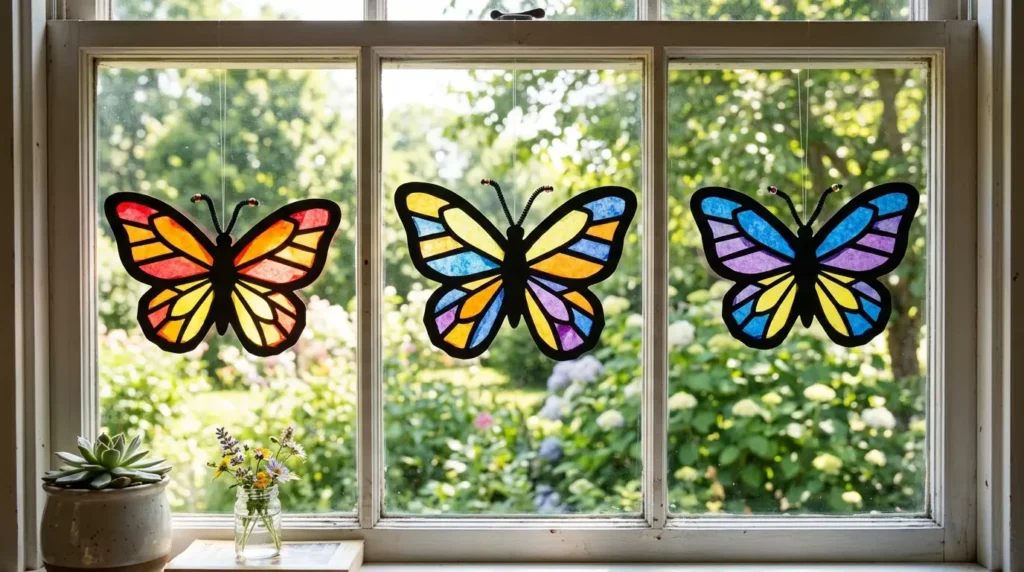
The tissue paper stained glass technique is the most accessible butterfly suncatcher method — suitable for children from age 4 upward and producing genuinely beautiful results from the simplest materials. It is the technique most suitable for batch-making as gifts or for classroom and group craft sessions.
Step 1: Create the butterfly outline
Draw a butterfly outline approximately 6 inches wide on black card. Draw the wing sections divided by lines as if designing stained glass leading — each wing section should be a separate enclosed shape. Cut out the butterfly outline along the outer edge only. Then carefully cut out each individual wing section leaving the black outline lines intact. The resulting black card frame should look like the lead lines of a stained glass window.
Step 2: Apply colored tissue paper
Place the black card butterfly frame face-down on a piece of clear contact paper sticky-side up. Cut small pieces of colored tissue paper and press them onto the sticky surface behind each wing section opening. Overlap different tissue paper colors slightly for a richer mixed color effect at the overlaps. Cover every open section of the butterfly with tissue paper.
Step 3: Seal and hang
Place a second piece of clear contact paper over the tissue paper layer and press firmly to seal the tissue paper between the two contact paper layers. Trim any excess contact paper around the butterfly outline. Punch a small hole at the top of the butterfly body and thread a length of fishing line or colorful ribbon for hanging. Hang in a sunny window immediately.
In direct sunlight the tissue paper glows with the saturated color intensity of real stained glass — a quality that is genuinely surprising given the cost of the materials. Make a collection of five to seven butterflies in different color combinations and hang at different heights across a window for a complete window display.
Gorgeous Ways to Display Butterfly Suncatchers
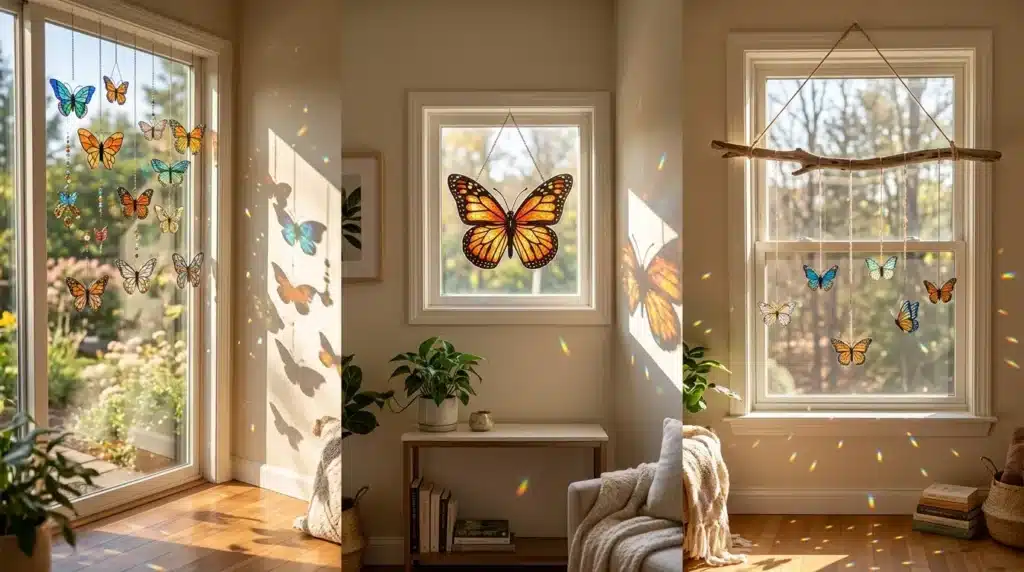
Window garden display:
Hang five to seven butterflies of different techniques and sizes across the full width of a window at varied heights using fishing line attached to a tension wire or curtain rod. The multiple butterflies at different heights create the impression of a butterfly garden frozen in flight across the window. Mix techniques — a beaded wire butterfly beside a tissue paper butterfly beside a resin version — for the most visually interesting display.
Driftwood mobile:
Tie three to five butterflies from a horizontal driftwood branch at varied heights and suspend the branch from two lengths of fishing line attached to each end of the wood. The hanging mobile turns gently in air movement from an open window creating the most lifelike butterfly flight effect of all display approaches.
Standalone statement piece:
One large resin or beaded wire butterfly hung alone in a small bathroom or bedroom window creates the most elegant and most restrained display. A single statement butterfly in a small window catches the specific quality of direct morning sunlight better than a group display and suits minimal and Scandinavian interior aesthetics perfectly. The DASTOLL Stained Glass Sun Catcher alongside a butterfly suncatcher in the same window creates a complementary rainbow light display. Find it linked on Amazon.
📌 More craft and home decor ideas: How To Make Gorgeous Jar Flower Shelf Decor That Looks Boutique-Quality
Frequently Asked Questions
How do you make butterfly suncatchers?
Butterfly suncatchers can be made using four different techniques depending on skill level and available materials. The easiest is the tissue paper stained glass method — draw a butterfly outline on black card, cut out the wing sections, apply colored tissue paper behind each section on clear contact paper, seal with a second contact paper layer, and hang in a sunny window. The most impressive is the resin and pressed flower method — pour clear resin into a butterfly mold, add pressed flowers, seal with a second resin layer, cure for 24 hours, and hang. All four techniques produce genuinely beautiful results from the first attempt.
What materials do you need for suncatchers?
The materials needed for butterfly suncatchers depend on the technique: beaded wire suncatchers need copper wire and transparent glass or crystal beads. Melted bead suncatchers need transparent plastic pony beads and a butterfly cookie cutter. Resin suncatchers need clear two-part resin, a butterfly silicone mold, and pressed flowers. Tissue paper suncatchers need black card, colored tissue paper, and clear contact paper. Fishing line for hanging suits all four techniques. According to The Spruce Crafts resin suncatchers are among the most popular beginner resin projects because the mold approach removes the need for any free-form shaping skill.
How do melted bead suncatchers work?
Melted bead suncatchers work by filling a cookie cutter shape with transparent plastic pony beads standing upright in a single layer on baking paper, then baking in an oven at 400 degrees Fahrenheit for 20 to 25 minutes until the beads melt and fuse together into a solid semi-transparent panel. The fused beads create a stained glass quality panel that allows light to pass through and refract in multiple directions. After cooling completely the fused panel is removed from the cookie cutter and hung in a window by a fishing line loop.
What window position is best for suncatchers?
South-facing and west-facing windows provide the most direct sunlight for suncatchers and produce the most dramatic light refraction effects — colored light pools on walls and floors and the maximum brilliance of transparent materials. East-facing windows produce beautiful morning light effects for a shorter period of the day. North-facing windows receive no direct sunlight and reduce the light-refracting quality of all suncatcher types significantly — beaded wire and resin suncatchers still look beautiful in north-facing windows in ambient daylight but the colored light projection effects require direct sunlight.
More Craft and Home Decor Ideas
→ How To Create Realistic Felt Flower Decorations
→ How To Make a Cotton Cloud and Star Mobile
→ How To Make Stunning Modern Geometric Christmas Tree Frames
Start with the tissue paper version tonight — 20 minutes, under $3, and the moment afternoon sun hits it through the window you will understand why suncatchers are one of the crafts people keep making year after year.