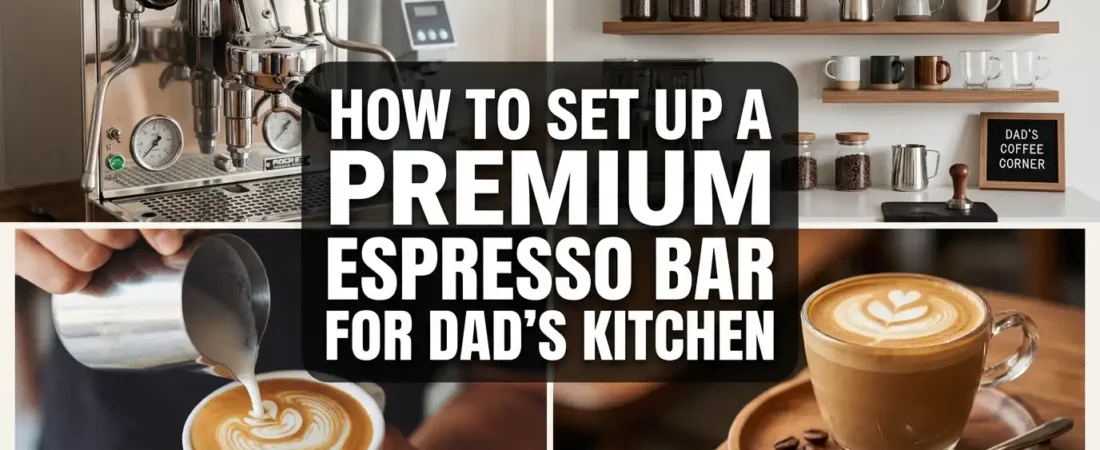
Most kitchen coffee corners stop at a machine, a bag of beans, and a mug tree that never quite fits the counter. A genuine home espresso bar setup turns that corner into something that actually functions like a specialty coffee station — organized by workflow, stocked for the drinks he actually makes, and styled well enough that it looks intentional rather than accumulated.
This guide covers how to build a premium home espresso bar setup from scratch — the counter zone planning, machine selection logic, the specific storage solutions that make daily brewing genuinely smooth, and the finishing details that make the station look and feel like a proper adult indulgence rather than a cluttered breakfast prep zone.
Table of Contents
Why the Zone Matters More Than the Machine
One of the most common mistakes in setting up a home coffee station is buying the machine first and figuring out where it goes second. The result is usually a machine positioned by default in whatever counter space happened to be available, with accessories piling up around it in no particular order, cords running in multiple directions, and beans stored wherever there is room rather than where they should be. The station looks full rather than organized, and the brewing process feels like more effort than it needs to be.
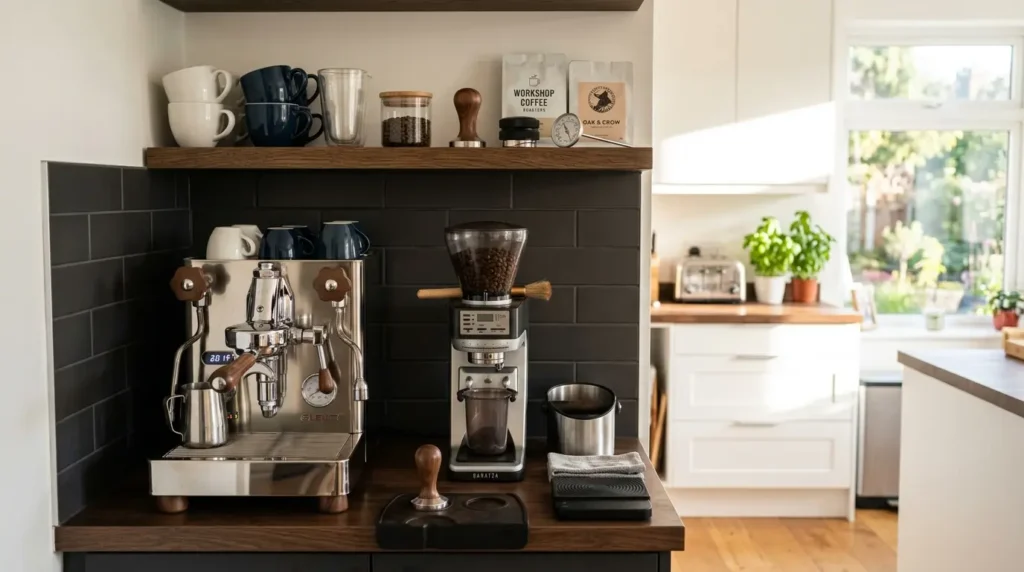
A proper home espresso bar setup starts with the zone — a clearly defined counter area, ideally 24 to 36 inches wide, that belongs entirely to the coffee station and nothing else. Within that zone everything has a specific position based on the order in which it is used during brewing: beans stored at the back, grinder beside the machine on the dominant hand side, tamper within reach of the portafilter, cups warming on top of the machine or on a small rack to the side.
This sequencing — where everything sits in the order of its use rather than in whatever gap was available — is what separates a coffee station that actually gets used every morning from one that looks good in a photo but proves annoying in practice. Professional baristas work this way not out of habit but because it measurably reduces the time and attention each step requires, which matters even more at home where the coffee is being made at 6 a.m. rather than fully awake.
Choosing the Right Espresso Machine for a Home Station
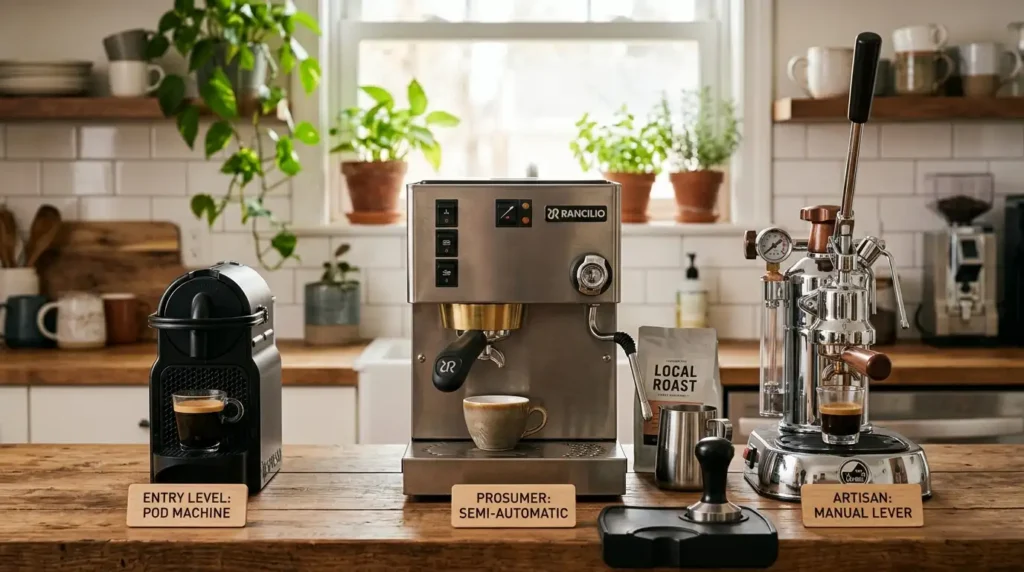
The espresso machine market roughly divides into three tiers, and the right choice depends almost entirely on how much involvement in the brewing process the dad actually wants, not on how premium the station should look. A person who wants excellent espresso with minimal fuss wants a different machine than a person who enjoys the ritual of grinding, dosing, tamping, and pulling a shot manually — and a station built around the wrong machine for the person tends to get used less and less over time as the friction outweighs the reward.
Entry level: super-automatic machines ($400 to $900)
A super-automatic machine grinds, doses, tamps, and extracts automatically from whole beans to finished espresso with a single button press. These machines eliminate almost every variable in the brewing process, which is both their appeal and their limitation. The coffee is consistently good without any skill requirement, but the ceiling on quality is lower than a well-dialed semi-automatic. For a dad who wants the genuine espresso experience at home without the learning curve, a Jura or De’Longhi super-automatic is the honest recommendation rather than a machine that will collect dust once the novelty of manual extraction wears off.
Mid-tier: semi-automatic machines ($500 to $1,500)
The semi-automatic category — brands like Breville, Gaggia, and Rocket — is where genuine craft espresso begins. The machine handles temperature and pressure; the user handles grinding, dosing, tamping, and timing the shot. This is the tier that produces the best results for a dad who is genuinely interested in coffee as a craft rather than purely a caffeine delivery mechanism, since it allows the meaningful variables to be adjusted and refined rather than automated away.
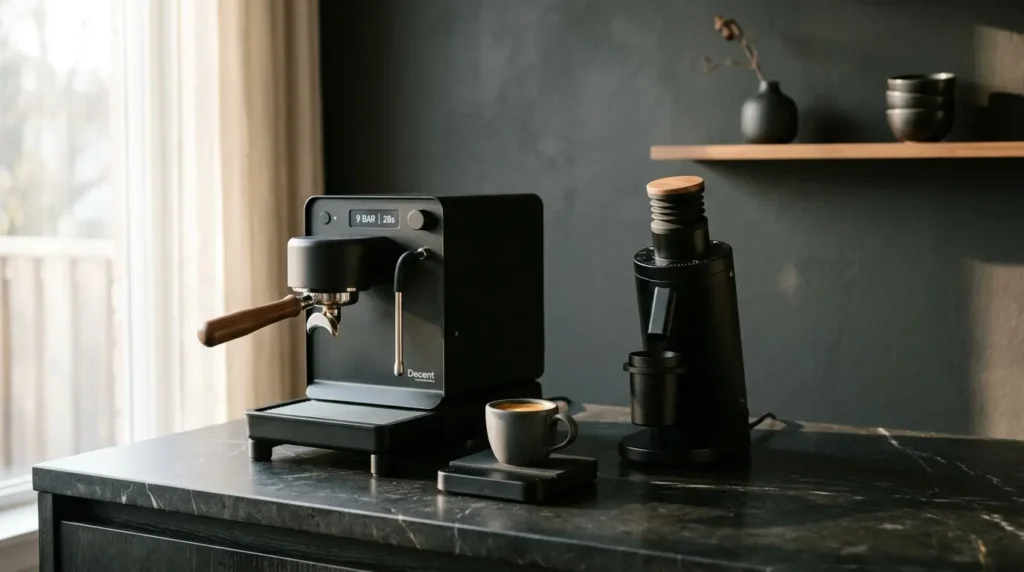
Top tier: prosumer machines ($1,500 and above)
Machines like the La Marzocca Linea Mini or the Profitec Pro 700 are genuinely commercial-grade equipment designed for home use, with temperature stability and build quality far beyond what most home setups need or can take advantage of. This tier makes sense for a dad who is already deeply experienced with espresso extraction, actively wants to work with competition-level variables, and will genuinely use those capabilities — not as aspirational equipment bought for how it looks on the counter.
Why the Grinder Matters as Much as the Machine
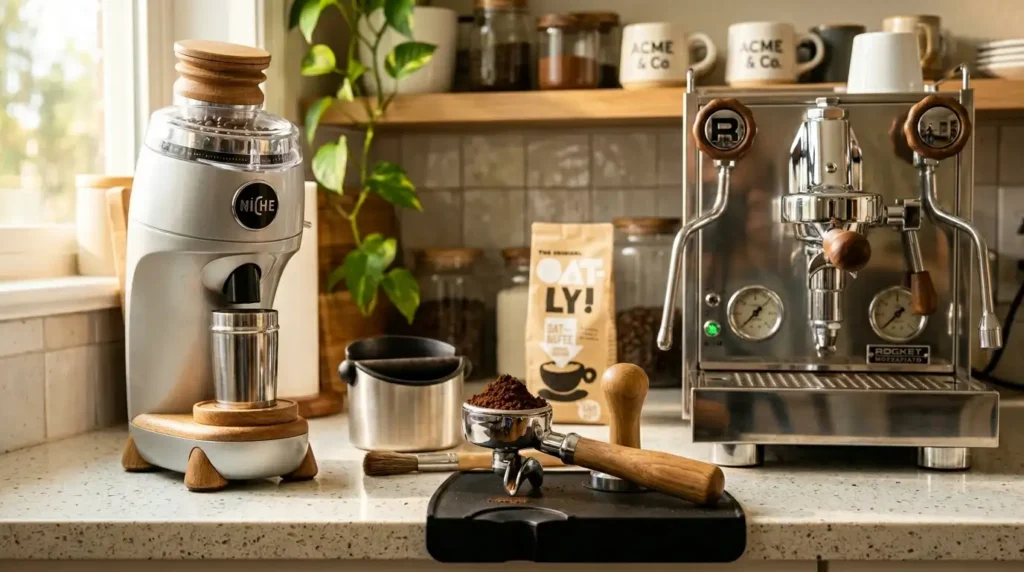
Specialty coffee professionals consistently make the same point when asked where to allocate a home espresso budget: spend more on the grinder than most people expect to. A mediocre grinder paired with an excellent machine produces mediocre espresso. An excellent grinder paired with a mid-range machine consistently produces better results than the reverse combination, because grind consistency — how uniformly even every particle is — affects extraction quality more directly than any variable the machine controls.
Flat burr grinders produce the most uniform grind particle distribution and are preferred at the high end of the market. Conical burr grinders are more forgiving with heat retention and slightly more accessible at moderate price points. Blade grinders — which chop beans rather than grinding them — produce such an inconsistent particle size that they actively undermine an otherwise well-equipped espresso setup regardless of how good the machine is.
For a home station paired with a semi-automatic machine in the $600 to $1,000 range, a grinder in the $150 to $400 range from brands like Baratza, Eureka, or Fellow is the appropriate pairing. A grinder at this level produces consistent enough particle distribution to allow meaningful shot-to-shot variation to be attributed to other variables rather than blamed on the grind, which is what makes improvement over time feel achievable.
Counter Layout and Organization for the Home Espresso Station
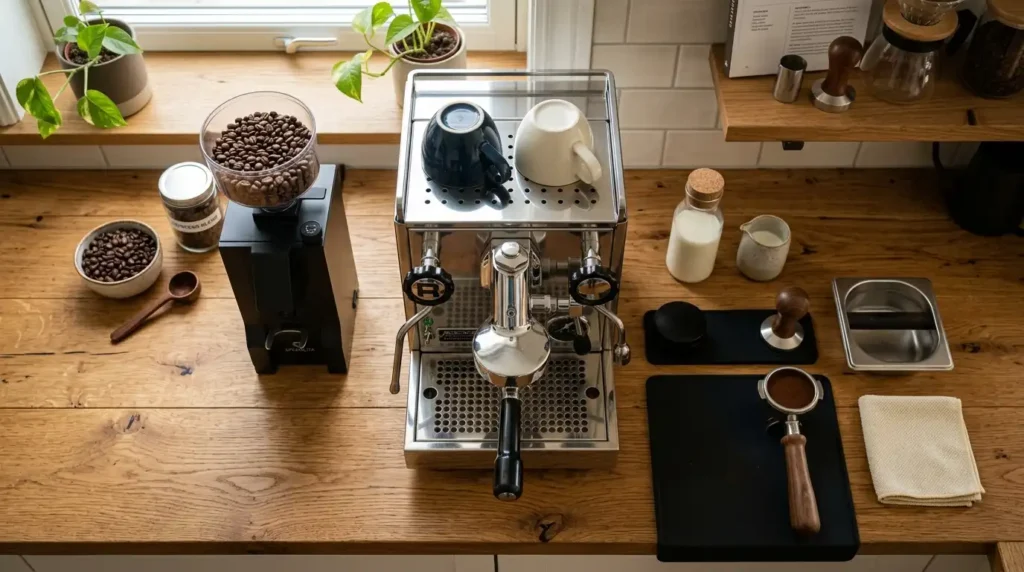
The counter layout of a home espresso station should follow a left-to-right workflow if the person is right-handed, or a right-to-left workflow if they are left-handed — the sequence runs from unground beans through the grinder, into the portafilter, onto the tamping mat, and into the machine, with the finished cup appearing on the right side. When every object sits in this sequence rather than scattered randomly, the morning routine reduces to a series of short, connected movements rather than a dozen separate reach-and-return trips across the counter.
Specific positions that consistently work well: beans in a sealed container at the back left of the zone, grinder at the back center or back left beside the beans, machine at the front center or front right, tamping mat directly in front of the machine on a slight angle, tamper stored on the mat or on a small magnetic holder to the right of the machine, cups warming on the machine top or on a small rack to the right.
Keep the counter surface within the zone clear of everything that does not belong to the coffee workflow. A single stray appliance cord, a fruit bowl positioned too close, or a mail pile that migrates into the zone will gradually erode the station’s definition until it looks and functions like the rest of the kitchen counter rather than a dedicated brewing space.
Minimalist Workflows for Daily Specialty Brewing Stations
The minimalist workflow approach to a home espresso station reduces the number of objects on the counter surface to only those touched during every single brewing session, and stores everything used occasionally — extra cups, backup beans, cleaning supplies — in a drawer, cabinet, or shelf directly below or above the station rather than leaving it visible on the counter.
This approach is stricter than most people initially want to be with their station, and almost always produces a setup that is both better looking and more genuinely functional than the alternative. The key question for every object considering a spot on the counter: does this get touched every time the machine is used, or only sometimes? If the answer is sometimes, it belongs in a drawer.
Objects that belong on the counter: the espresso machine, the grinder, one sealed bean storage container, the tamper on its mat, and two cups warming on the machine top. Nothing else. A paper towel holder beside the machine is a practical addition many brewers keep visible because the drip tray and portafilter both leave coffee residue that needs a quick wipe after every pull.
Objects that do not belong on the counter regardless of how coffee-related they feel: a full collection of mugs, multiple bean varieties in multiple bags, a milk frothing pitcher between uses, coffee syrups, spare portafilter baskets, or any cleaning equipment. A small pull-out drawer directly below the station surface is the most space-efficient storage solution for all of these, keeping them immediately accessible without cluttering the workspace above.
Styling the Espresso Bar Station to Look Genuinely Premium
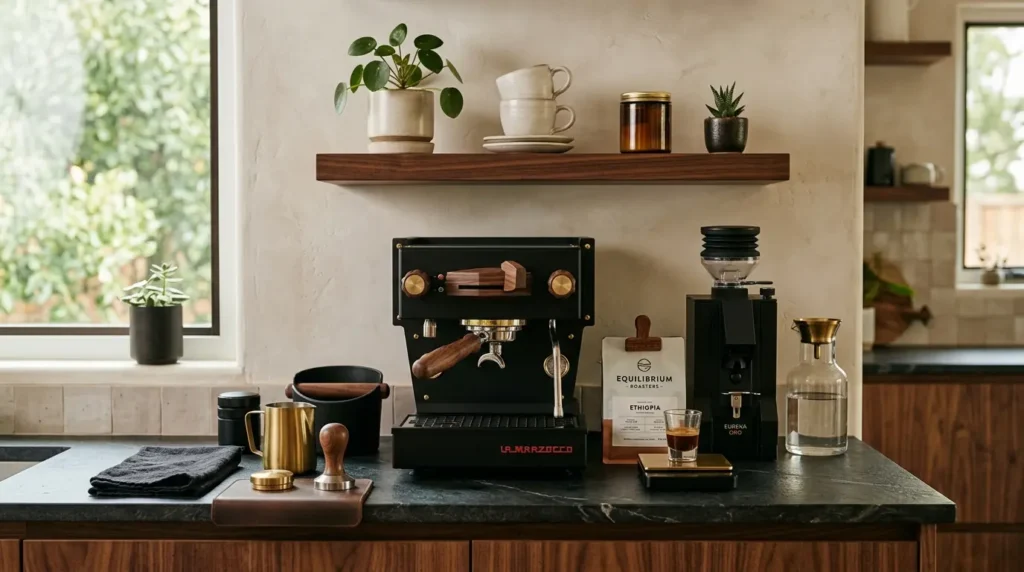
A coffee station that looks premium is almost entirely a function of material and color consistency rather than spending more on equipment. Two machines of identical quality sitting in two different counter arrangements can read as radically different in perceived value, simply based on whether the surrounding materials are cohesive or chaotic.
Choose one hardware finish and stay with it:
Matte black, stainless, or brushed brass — whichever the machine uses, match the grinder, tamper, cup rack, and any visible accessories to the same finish. A mix of chrome, black, and brass across a single small counter zone reads as assembled rather than designed.
Add a floating shelf above the station:
A single walnut or dark-stained timber floating shelf positioned 18 to 24 inches above the counter surface provides display space for a small collection of cups, a bag of specialty beans, or a compact plant — and visually frames the station as a defined zone rather than just a corner of the counter.
Use a counter mat under the machine:
A rubber or leather counter mat beneath the machine and grinder protects the counter surface from drips and vibration, and serves the secondary purpose of visually defining the station’s footprint on the counter. A dark rubber mat under dark matte equipment creates a clean base that makes the entire station look like it was placed intentionally.
Bean Storage and Freshness on the Home Espresso Bar
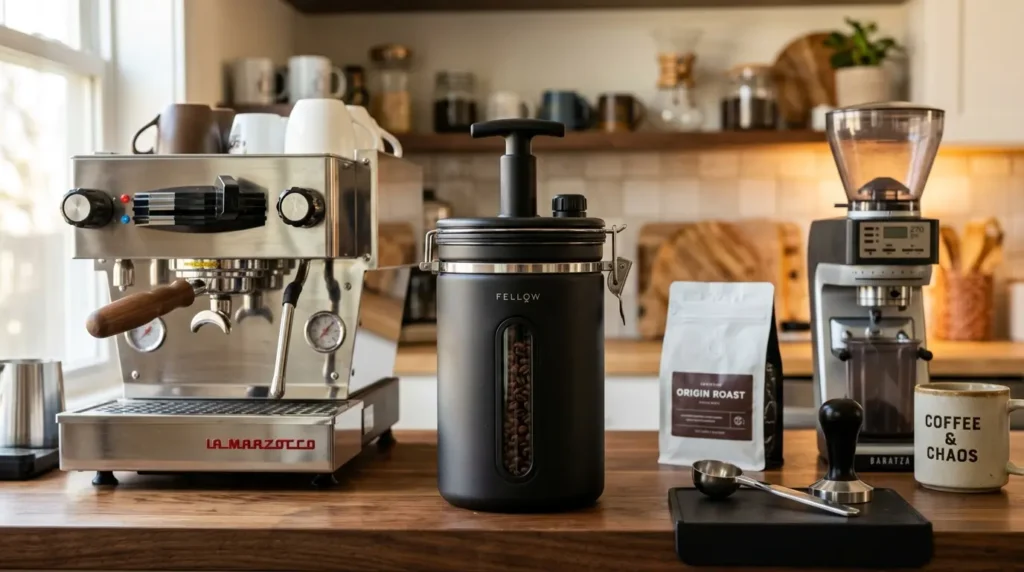
Coffee beans begin losing their best flavor characteristics within two to three weeks of the roast date under ordinary storage conditions, and significantly faster once ground. This means that the most meaningful quality improvement available to a home espresso station has nothing to do with equipment and everything to do with using freshly roasted beans bought in small quantities and stored correctly.
A vacuum-sealed or airtight container with a CO2 valve is the correct storage solution for beans sitting on the espresso bar counter — it slows the oxidation that dulls flavor while venting the natural CO2 that freshly roasted beans off-gas, which would build pressure inside a fully sealed container. Brands like Airscape, Fellow, and Atmos produce airtight containers designed specifically for this application, and all three look substantially more intentional on a well-styled station than a generic jar or an open bag rolled down and clipped.
Store no more than one to two weeks of beans in the counter canister at a time, with additional beans kept in a cool dark cupboard or the freezer in an airtight bag. Freezing whole beans in a sealed bag with as much air removed as possible extends freshness significantly longer than counter or room-temperature storage, and frozen beans can be ground directly from frozen without any detectable quality penalty.
📌 More home decor ideas: 7 Front Door Decor Ideas That Make Dad Feel Proud
Frequently Asked Questions
What do I need to set up a home espresso bar?
The essential equipment for a home espresso bar is a semi-automatic or super-automatic espresso machine, a quality burr grinder, a tamper, an airtight bean storage container, and a milk frother or steam wand if lattes and cappuccinos are part of the daily routine. According to the Specialty Coffee Association, grind consistency is the single most impactful variable in home espresso quality, which makes the grinder equally important to the machine in any setup budget rather than an afterthought purchased cheaply to save money for the machine.
How much counter space does an espresso bar need?
A functional home espresso bar needs a minimum of 24 inches of counter width and at least 18 inches of depth to accommodate a machine and grinder side by side without crowding. A more comfortable setup uses 30 to 36 inches of width, which allows the full left-to-right workflow sequence — beans, grinder, machine, tamping area, cups — to sit in order without objects overlapping each other’s working space.
What espresso machine is best for a home coffee bar?
The best espresso machine for a home coffee bar depends more on the desired level of involvement in brewing than on any single quality specification. For hands-off convenience, a super-automatic from Jura or De’Longhi. For craft espresso with meaningful variables to adjust, a semi-automatic from Breville, Gaggia, or Rocket in the $600 to $1,200 range. For a dad who is already deeply experienced and wants commercial-grade equipment, prosumer machines from La Marzocca or Profitec represent the top of what is available for home installation.
How do I make my home coffee bar look more professional?
The most impactful changes for making a home coffee bar look more professional: establish a consistent hardware finish across all accessories, clear everything from the counter surface that does not belong to the active brewing workflow, add a floating shelf above the station to frame it as a defined zone, place a counter mat beneath the machine and grinder to visually anchor the station, and store beans in a quality airtight canister rather than in an open bag or generic container.
More Home Decor Ideas
→ Reading Nook Ideas Around Dad’s Favorite Chair
→ How To Build a Cozy Dad’s Retreat Patio Corner
→ 10 Father’s Day Gifts for Gardeners He Will Actually Love
Sort the zone before you sort the equipment. A $400 machine in a well-organized station makes better coffee every morning than a $1,500 machine buried in a cluttered corner.